After eight long years we have finally, finally, FINALLY painted the upstairs hallway. It is done! No more builder paint and scratchy flat walls scraping up my knuckles when I move laundry baskets. Can you hear the Hallelujah Chorus singing in the background? I would do cartwheels if I thought it wouldn't cause serious injury.
The color is Burnished Clay by Behr. It's a light gray with a hint of blue to it. It's the same color we used in the bonus room, and is a definite change over the gold and white combo we had going on before. (Half of the hallway was painted before. The other half was still white builder paint. Classy, I know.)
It took us forever to repaint because there are some high ceilings in the stairway and the best way to paint those high corners was not always obvious. But with some pole wielding and ladder maneuvering, we made it happen.
The thing about this space is there is no natural light. The only light that it gets is from the bedroom windows. If the bedroom doors are shut, the hallway is dark. So I picked the gold eight years ago thinking it would help keep things bright. And it certainly did cast a gold glow on everything. EVERYTHING.
Here it is midway through. You can see how the gold wall (left) casts a gold glow on the gray wall (right) so that you can't even tell it's not gold. Maybe I should consider a new kind of brighter white light bulb in there. But honestly, I have no idea how we'd get to it. Fourteen feet up in the middle of a stairwell. I fear the day that bulb burns out.
We've done the entire upstairs hallway, and the stairwell, and one small wall in the downstairs hallway. So we do have more of the downstairs hallway to do. This is more like a few hour job than a weekend job, though. Lots of cutting in and not a lot of wall space.
Now that the walls are a much cooler color, I'm looking forward to adding some more pops of color somehow. I'm thinking of doing some kind of timeline on the walls that
has the history of our family... from our first date up to now. Maybe?
I do like the new color, and I'm debating just going for it in the family room too. (It is also gold/yellow.) We'll see. I'll probably just live with for a while, because we all know how efficient I am at getting these painting projects done!
Monday, July 14, 2014
Thursday, May 22, 2014
When Life Gives You Mud, Make a Mud Room
One of the first things we did was get some cheap bath mats at Target. I had been looking at some beautiful outdoor rugs online, but as we all know, I am incredibly indecisive about my home decor choices. So when we saw these rugs on clearance for $12 each, we snatched them up as a temporary solution. Now that they're on the floor, I really like how soft they are, and how they are machine washable. So the temporary may be a more permanent solution.
During a craft night a while back, I took a giant canvas and some stencils and created the big sign above the top shelf. I intended it to be a little greener to match the rug, but I guess the paint had other ideas. I also plan on hanging it on the wall instead of leaning it, so that you can see the bottom line better from the ground. Just haven't gotten around to it yet.
On the baskets on the side, I picked up some cheap cardboard letters from the craft store and mod podged tissue paper to them. Now each family members has a basket with their initial on it.
So what's left? We still need to put some baseboard molding and trim in a few areas, including around the back door, and drywall the entire garage. I'd also like to put some kind of stair tread on the kitchen doorstep so that it's not just an ugly concrete step.
There's also some general cleaning, spider web removal and trim painting to be done. Eight years of scratch marks to cover up there. Now that it's finally warm, I just need to be less lazy.
I'm also debating painting the two doors a fun color. Maybe purple like the front door? Or navy? Or some kind of green/blue/aqua? And maybe some fun vinyl decal? "Hello" on the kitchen door and "goodbye" on the back door, perhaps? I'm open to suggestions. I also ordered some navy blue fabric to make a bench seat. We've been a little hesitant to sit there for fear of scratching the paint, so that will be nice when I get it done in a couple years.
Overall, we love the space and we use it often. And it's a huge improvement from where we were last year. Hooray for progress!
Wednesday, May 14, 2014
Springing Back to Life
When I first moved to Wisconsin, people would give me crazy advice like.... be sure to go on vacation in April to get away from the cold weather ... or don't plant your flowers until after Mother's Day or they'll freeze. I thought they were nuts. I grew up in the Northwest, where you see tulips and daffodils in March and spring comes early. But here it is, May 14, and we're just now getting ready to plant things. It's been cold here. Very, very cold.
But not anymore, friends! Spring is finally here. The color green is once again in our vocabulary and things are springing (!) back to life. In fact, look how great our lawn looks this year.
I'm planning another big veggie garden this year, so I had my father-in-law Tom come over and build another garden box. I think he sees it as an investment in the future. We both have a weakness for Uncle Mike's pickles, made with cucumbers from the garden. The more room we have to play with, the more pickles we end up with! Tom built the other two garden boxes for us last year and it made the gardening so much easier. There were fewer weeds and everything seemed healthier and hardier. And no bunny troubles!
We used the same basic structure - just a few fence boards with some balusters and chicken wire. And thanks to an excessively large dirt purchase last year, we had quite a bit of extra soil hanging out in the back yard. Ben and Tom were nice enough to move it into the new box for me, while our two favorite little supervisors stood watch.
So now, all that's left is plants. We have a nice little family-owned greenhouse around the corner, so I may take a walk with our wagon sometime soon.
But not anymore, friends! Spring is finally here. The color green is once again in our vocabulary and things are springing (!) back to life. In fact, look how great our lawn looks this year.
Not a single dandelion in sight! Well, except for that giant one in the
front flower bed, but we'll just call that one a little extra color. Here's the backyard.
I'm planning another big veggie garden this year, so I had my father-in-law Tom come over and build another garden box. I think he sees it as an investment in the future. We both have a weakness for Uncle Mike's pickles, made with cucumbers from the garden. The more room we have to play with, the more pickles we end up with! Tom built the other two garden boxes for us last year and it made the gardening so much easier. There were fewer weeds and everything seemed healthier and hardier. And no bunny troubles!
We used the same basic structure - just a few fence boards with some balusters and chicken wire. And thanks to an excessively large dirt purchase last year, we had quite a bit of extra soil hanging out in the back yard. Ben and Tom were nice enough to move it into the new box for me, while our two favorite little supervisors stood watch.
So now, all that's left is plants. We have a nice little family-owned greenhouse around the corner, so I may take a walk with our wagon sometime soon.
Wednesday, March 5, 2014
This Garage is Awesome
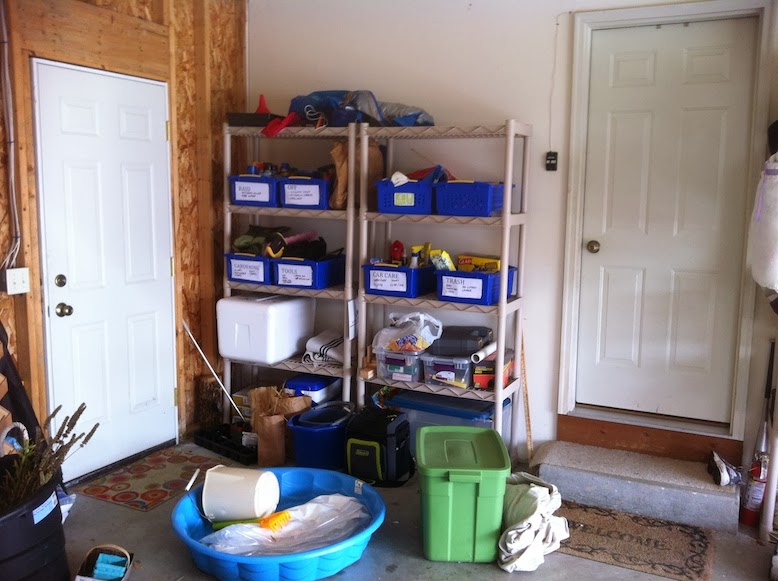
Hey remember when our garage looked like this?
And then this?
And then it looked like this?
Well now it looks like this!
Our mudroom system is finished! And none too soon. We've been using this space a lot lately. Have I mentioned how freakishly cold and snowy it has been this year? Here's a recent view out that back door. A couple steps further and E was in above her knees.
Anyway, it has been so nice to be able to dump off all the coats, hats, gloves, scarves and muddy boots BEFORE they enter the house. Yes, they do get a little cold out there, but with the new insulation in the garage, it hasn't been as bad as I had feared.
Up next on the Project Awesome Garage agenda: painting the interior garage doors and trim, adding drywall to the garage, adding some trim, baseboard and caulking in a few areas, putting down an outdoor rug to cover the laminate floor, and sewing a custom bench cushion. And possibly a few other cute little touches here are there - maybe some big art or a mural or quote above the top shelf? But the bulk of the work is done and it is so nice to have a space that we can use!
Let's take another moment to enjoy the transformation, shall we?
Tuesday, February 4, 2014
Reusin' Stuff
Have I mentioned how much I love reusing stuff? Remember that candy machine I made for E's birthday a couple years ago? I'm happy to say it's been getting some use lately. Some paint, tinfoil and cardstock, and we transformed it into a rocket ship for J's b-day and a Mickey for E's b-day.
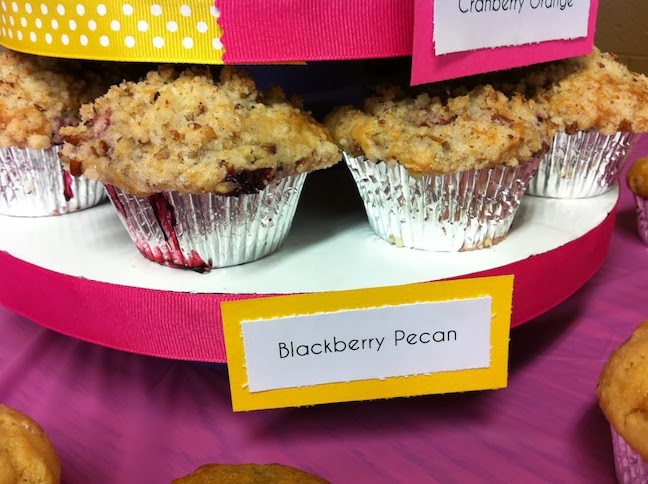
And remember the muffin tower I made for a friend's baby shower? It became the a Mickey cupcake tower for E's b-day too. Just swap out the ribbon, paper and treats and we're in business.
Cheap and easy - just the way I like it.
Wednesday, January 29, 2014
We've Got Ears, Say Cheers!
In November, J had a rocket birthday. When E found out, she wanted a rocket party too. But not just any rocket party. It must be a RED rocket party. Whatever that means. Well, I wasn't really in the mood to repeat the rocket theme three weeks later for her b-day. So naturally, I went on the offensive. For weeks, I tried to convince her that she wanted to a have a Daniel Tiger party. This was an entirely selfish request, for I really just wanted to make a trolley cake. Wouldn't that be adorable?
Well, eventually I got her to cave. But not on the Daniel Tiger part. Instead, she said she wanted a Mickey party. With Mickey cupcakes and balloons. This I could handle.
And since E isn't really a fan of big parties anyway, we kept it small and sane. Not the way I usually do things, but I'm starting to see the wisdom in simplicity. (Namely, that simplicity = more sleep, and I LOVE sleep.)
So, we did a cupcake tower, some Mickey candy bowls, a Mickey banner, and some Mickey cookies. And considering her b-day party was two and half weeks before Christmas and two days before a big church event I was helping with, we managed to pull it off and stay sane. And have some Mickey fun in the process. Hot Dog!
The invites...
The cupcake tower...
The banner for the birthday girl...
The Mickey candy bowls...
Because the Muffin Top is the Best Part
This was really easy to do. I had some pre-cut cake circles (in the cake aisle at Hobby Lobby) and taped three together. I used 6-, 8-, 10- and 12-inch circles. If you don't have any lying around, you could use any cardboard or foam board. I just happen to be a girl who has this kind of thing waiting around for a raining day.
Use a hot glue gun to affix some ribbon to the edges. Then take the tomato sauce cans and cover them with scrapbook paper. Glue the cans in between each set of circles and you're all done. It only took about 10 minutes and I think it made the presentation look a lot better.
Oh, and the muffins were delicious.
Tuesday, January 7, 2014
Blast Off! J is One!
In November, our sweet baby J turned one! (Or as E says, "He's not a baby anymore. He got big.")
A few months ago, I found some cute rocket ship invitations and party supplies on super clearance at Hobby Lobby, and we ran with the theme.
I have this genetic compulsion to go overboard on things, and for my own sanity, I'm trying to break the habit. So we went a little simpler than we did for E's first b-day. But of course, old habits die hard, so we did have a bit of fun!
First up... the food.
We made rocket and star cookies... (I didn't have a rocket cookie cutter, so we used a strawberry cookie cutter upside down.)
...and cupcakes with little paper stars on sticks...
...and of course a cake...
And here it is all together.
For decorations, we used E's candy machines and turned them into rockets...
...A garland with rockets and astronauts, similar to what we did for E (again, I forgot to take a picture!)
It was a great party and the birthday boy had a blast!
A few months ago, I found some cute rocket ship invitations and party supplies on super clearance at Hobby Lobby, and we ran with the theme.
I have this genetic compulsion to go overboard on things, and for my own sanity, I'm trying to break the habit. So we went a little simpler than we did for E's first b-day. But of course, old habits die hard, so we did have a bit of fun!
First up... the food.
We made rocket and star cookies... (I didn't have a rocket cookie cutter, so we used a strawberry cookie cutter upside down.)
...and cupcakes with little paper stars on sticks...
...and of course a cake...
... and some rocket shaped fruit kabobs... (on the left here - I forgot to take a better pic. The stands are dollar store floral foam covered in cardstock.)
And here it is all together.
For decorations, we used E's candy machines and turned them into rockets...
...A garland with rockets and astronauts, similar to what we did for E (again, I forgot to take a picture!)
...And my favorite - a rocket ship photo backdrop so people could take a pic of the birthday boy in a rocket ship. (It is sitting on a music stand. Background paper from Hobby Lobby, hanging planets from Oriental Trading, the awesome rocket made by Maryke.)
And finally, for activities for the kids, we had a rocket building station where they could make their own rocket ships and birthday hats. There was lots of messy, creative fun going on!
It was a great party and the birthday boy had a blast!
Subscribe to:
Posts (Atom)