Showing posts with label birthday. Show all posts

Wednesday, January 29, 2014

We've Got Ears, Say Cheers!

In November, J had a rocket birthday. When E found out, she wanted a rocket party too. But not just any rocket party. It must be a RED rocket party. Whatever that means. Well, I wasn't really in the mood to repeat the rocket theme three weeks later for her b-day. So naturally, I went on the offensive. For weeks, I tried to convince her that she wanted to a have a Daniel Tiger party. This was an entirely selfish request, for I really just wanted to make a trolley cake. Wouldn't that be adorable?

Well, eventually I got her to cave. But not on the Daniel Tiger part. Instead, she said she wanted a Mickey party. With Mickey cupcakes and balloons. This I could handle.

And since E isn't really a fan of big parties anyway, we kept it small and sane. Not the way I usually do things, but I'm starting to see the wisdom in simplicity. (Namely, that simplicity = more sleep, and I LOVE sleep.)

So, we did a cupcake tower, some Mickey candy bowls, a Mickey banner, and some Mickey cookies. And considering her b-day party was two and half weeks before Christmas and two days before a big church event I was helping with, we managed to pull it off and stay sane. And have some Mickey fun in the process. Hot Dog!

The invites...

The cupcake tower...

The banner for the birthday girl...


 The Mickey candy bowls...


Tuesday, January 7, 2014

Blast Off! J is One!

In November, our sweet baby J turned one! (Or as E says, "He's not a baby anymore. He got big.")

A few months ago, I found some cute rocket ship invitations and party supplies on super clearance at Hobby Lobby, and we ran with the theme.

I have this genetic compulsion to go overboard on things, and for my own sanity, I'm trying to break the habit. So we went a little simpler than we did for E's first b-day. But of course, old habits die hard, so we did have a bit of fun!

First up... the food.

We made rocket and star cookies... (I didn't have a rocket cookie cutter, so we used a strawberry cookie cutter upside down.) 


 ...and cupcakes with little paper stars on sticks...


...and of course a cake...


... and some rocket shaped fruit kabobs... (on the left here - I forgot to take a better pic. The stands are dollar store floral foam covered in cardstock.)


And here it is all together.


 For decorations, we used E's candy machines and turned them into rockets...


...A garland with rockets and astronauts, similar to what we did for E (again, I forgot to take a picture!)

...And my favorite - a rocket ship photo backdrop so people could take a pic of the birthday boy in a rocket ship. (It is sitting on a music stand. Background paper from Hobby Lobby, hanging planets from Oriental Trading, the awesome rocket made by Maryke.)

And finally, for activities for the kids, we had a rocket building station where they could make their own rocket ships and birthday hats. There was lots of messy, creative fun going on!


 It was a great party and the birthday boy had a blast!


Saturday, August 24, 2013

Celebrate Good Times

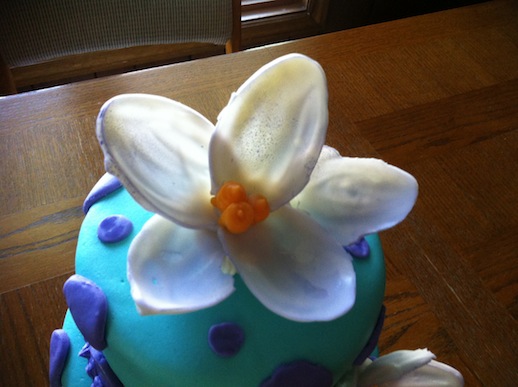
It seems like there's always something to celebrate around here. Last month, I spent an afternoon with one of Ben's cousins, making her birthday cake with her and teaching her some decorating tricks. She asked for a teal cake with purple polka dots. Here's where we ended up!

After a disastrous failed attempt at making fondant and gum paste flowers, I used candy wafers to make the flowers. Just melt some wafers in the microwave (follow the instructions on the bag, and DON'T add any other liquid!) and dip a plastic spoon back into the bowl to coat it with melted candy. Don't get any candy anywhere else on the spoon. Put the spoon in the fridge (candy side up) for a few minutes to harden the candy, and then slowly peel it off. Expect that about half of them will break - so be patient!


I used regular plastic spoons for the flowers on the sides, and a larger serving spoon for the flower on the top. (I think it came from the dollar store.)


I used some additional melted candy and extra buttercream as a glue to hold the petals together. I finished them with some aerosol food coloring - although the color didn't absorb as well as I would have liked.
 

The cake looked so pretty all lit up, and I think the birthday girl was happy with it too!


Also, a few months back, Ben and I celebrated our 10 year anniversary. 10 years! Wow, time flies. Anyway, since the idea of taking two small children to Hallmark grips me with fear, I made Ben a card.


Actually, I made him two cards. I couldn't decide. Here's the other.


I used www.timeanddate.com to come up with the numbers. Don't forget to account for all those leap years!

And finally, check out this canvas that Janet made for her husband for Father's Day with hand prints from their three boys. Isn't it great?


Sunday, December 4, 2011

Time for Tea and Sweets

My beautiful daughter is turning one this week and we had a birthday bash for her over the weekend. One of her favorite toys is her little singing teapot, so we decided to have a tea and sweets party. And of course I'm in love with the turquoise and pink combination so I couldn't resist splashing the house with color.

Thanks to my good friend Pinterest, I had lots of ideas for baking and decorating for the party. It could be said that I went a little overboard, but how many times does your precious baby girl turn one year old? (I'll try to add links for all the projects and recipes soon!)

First, the food. We started off with a massive sweets table, including cake, cake pops, homemade peppermint patties, rocky road fudge, raspberry almond jammies, peppermint-chocolate marshmallows, caramel brownie cheesecake, snickerdoodle mix and sugar cookies.  Oh yeah, and tea, coffee and punch.

I also put together these great candy machines using a flower pot and a glass bowl. They were really cute and so cheap and easy to make! I filled one with chocolate and placed it on a table for a centerpiece and filled the other with gummy cherry slices and placed it on the sweets table. For the tablecloths, I took advantage of some great after-Thanksgiving sales at JoAnn's to get some pink and blue felt. We cut a simple scallop pattern to make an easy runner. I think we covered all the tables for less than $10 and they looked so much better than those cheap plastic tablecloths.


For the favors, I filled baby food tubs with chocolate pieces and added a ribbon and a tag. For the kids, I put together some treat bags with animal crackers.


I made some tissue paper pom poms for above the treat table and photo backdrop and also made an adorable garland banner using scrapbook paper and some photos of my daughter. We made a tutu for her high chair using tulle strips found on clearance at hobby lobby. We knotted tulle slips onto pieces of elastic and affixed them to the high chair using binder clips.


Not so simple and easy were the ribbon topiaries. Well maybe they were easy, but they definitely were not quick. You take a styrofoam ball, loop a bunch of ribbon into little circles and use straight pins to stick them in place. Then stick a dowel in one end and stick it in a styrofoam block in a box, or bag on the bottom. They took much longer than expected and my poor thumbs were so sore from sticking in hundreds of pins.

Side note - at Hobby Lobby, in the ribbon aisle by the fabric, look on the bottom shelf. You can buy a bag of 15 ribbon remnants - 2 yds long each - for $1.99!  I really like how these turned out and they were a nice centerpiece for the extra tables.

Finally, we really like documenting milestones in our daughter's life, so we put up a photo backdrop (using the same felt as the tablecloth and the same tissue poms as above the table) and asked our friends to take pictures with the birthday girl so she could celebrate the day for years to come. We also laid out some of the photo books from the past year so people could flip through and see how much she's grown. And, we put out a matted photo frame where people could write their birthday wishes. (Thank you Auntie Janet!)


We had a wonderful day and it was so fun to see all of our family and friends come together to celebrate! (And a special thanks to Holly and Lily Bella Photography for all the great photos!)