Saturday, August 24, 2013

Celebrate Good Times

It seems like there's always something to celebrate around here. Last month, I spent an afternoon with one of Ben's cousins, making her birthday cake with her and teaching her some decorating tricks. She asked for a teal cake with purple polka dots. Here's where we ended up!

After a disastrous failed attempt at making fondant and gum paste flowers, I used candy wafers to make the flowers. Just melt some wafers in the microwave (follow the instructions on the bag, and DON'T add any other liquid!) and dip a plastic spoon back into the bowl to coat it with melted candy. Don't get any candy anywhere else on the spoon. Put the spoon in the fridge (candy side up) for a few minutes to harden the candy, and then slowly peel it off. Expect that about half of them will break - so be patient!


I used regular plastic spoons for the flowers on the sides, and a larger serving spoon for the flower on the top. (I think it came from the dollar store.)
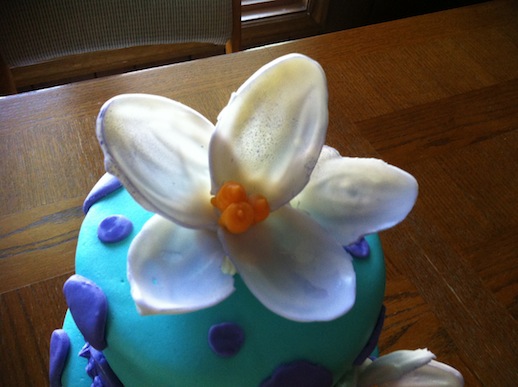

I used some additional melted candy and extra buttercream as a glue to hold the petals together. I finished them with some aerosol food coloring - although the color didn't absorb as well as I would have liked.
 

The cake looked so pretty all lit up, and I think the birthday girl was happy with it too!


Also, a few months back, Ben and I celebrated our 10 year anniversary. 10 years! Wow, time flies. Anyway, since the idea of taking two small children to Hallmark grips me with fear, I made Ben a card.


Actually, I made him two cards. I couldn't decide. Here's the other.


I used www.timeanddate.com to come up with the numbers. Don't forget to account for all those leap years!

And finally, check out this canvas that Janet made for her husband for Father's Day with hand prints from their three boys. Isn't it great?


Staying Dry

Remember back in March how I mentioned that our basement always seems to be wet? And that I was sick of it?  Things were getting so bad around here, that we had the wet vac on standby in the basement every time it rained, just in case.

Well, in June, our basement took on some water yet again. And again it was a silly, pointless sump pump failer. Another late night workout with the vac. Hey, at least it's good cardio.

Well, this time we decided we weren't going to mess around. We walked past the pallet of the cheap-o sump pumps at Lowe's, and headed straight for the mother of all sump pumps. Ladies, and gentlemen, I give you the extremely expensive, yet extremely effective Basement Watchdog. Because you can't put a price tag on keeping the junk in your basement dry.


Backup pump, backup battery - this thing has it all. And after a couple of serious rain storms, including the return of the lake in the back of the yard and some nice little marble sized hail, the basement is still dry.


Hooray! I remain optimistic that this will fix things. Although I did buy a couple of water sensors for the basement floor. Just in case.


Saturday, August 10, 2013

Garden Goodness

Remember a couple months ago when the garden looked like this?


Well, today it looks like this!


Lots of growing going on around these parts. The organic garden soil mix I used in the new containers has been great. I'm always amazed at how fast everything grows.

In the other corner, here's the blackberry bush, which also gets bigger every year.


Because of this year's mild summer, it hasn't been that tough to keep up with everything. My tomatoes are stuck at green, and my blackberries are stuck at red. E and I walk to the garden every day to see what's ripe and it has been a great lesson in patience.


I have harvested a few cucumbers and some dill for pickles...


Some delicious green beans...


And some of that lemon balm for shortbread cookies.


I've also picked a few handfuls of blackberries, but they usually don't make it out of the backyard. Yum yum!

Thursday, July 4, 2013

Happy Fourth!

Happy Fourth of July! We're celebrating here by going bed early. Exciting, I know. But we had an early morning and we have a couple other parties coming up this long holiday weekend.

Check out the fun wreath I made for the front door. Cost about $13 in supplies with enough to make another. I used a straw wreath (keep the plastic wrap on!), some yarn, scotch tape and pre-cut wood stars that E painted white for me. Easy, but a little time consuming to wrap the yarn. The idea came from a few of the flag wreaths and tutorials floating around Pinterest.

Hope you have a fun and festive Independence Day!

Tuesday, June 25, 2013

Cutie Pie Kiddos... and Designing with Clutter in Mind


Remember those photos I mounted last weekend? I got around to putting them up a couple days ago. Honestly they would have sat around a lot longer, but I was worried that some little fingers would mess them up. Nothing like your own sticky kids to motivate you to get things done!

So here they are. Aren't they beautiful? I love how they turned out. You know what else I love? Having the talented photographer Holly Isaacson as my sister-in-law. Seriously I wonder how she accomplishes all that she does, and still has time to take such beautiful photos and run an awesome art blog and still raise three fantastic kids. 

When I put up the frames up above Jonas' changing table in his nursery, I used the toothpaste method I found on Pinterest. A complete and total disaster. Not only did I get toothpaste everywhere (except where it needed to be), but it took me hours to get those photos just right.

This time around, I simply put up paper that matched the frame size (12x12 scrapbook paper) and arranged it how I liked it. Stuck a few nails through the paper that matched the hangars on the frame and we were done. It still took a bit of time with a ruler but overall SO MUCH EASIER.


Now here's the thing about design that really gets to me. When you see all those pretty photos on blogs and in magazines, the rooms are clearly staged. Stylists come in and arrange things just so and then nobody breathes or moves until the picture is perfect. The truth is no one lives like that. There is no way that anyone (at least anyone with kids) has a room that is that clean and that perfect for more than five minutes. And all those crystal or ceramic vases and bowls that are placed all around? Those wouldn't survive a day around here. As much as I hate it, clutter is a way of life. It just piles up.

So as I stared at the paper on the wall, I thought to myself that the photos should be lower. They look too high up and unevenly placed for the space. But then I remembered (actually, I tripped on) all the clutter I had moved to the floor.


If I don't live my life picture perfect like a magazine, why should I place the photos that way? So I decided to hang them with future clutter in mind. That way, when the clutter piles up like it inevitably will, the photos won't be hidden and won't serve as another reminder about how chaotic my life has become. None of us need one more thing staring us down and telling us we don't have our act together. The kids do that for me all on their own. Ha!


So higher up they went, and then the clutter got added back in. (I will confess that I did put some of it away.) Maybe I'm desensitized, but now I kind of like the clutter and how it looks all together. And in reality it's the way I live. It's why I have an office chair around my dining room table, why my coffee table is completely out of reach of the couch and why the vacuum doesn't have a permanent home and yet never gets used. Because it works for us.


That's why I love these photos so much. They remind me of what's important in life. So here's to you, cutie pie kiddos. I love you lots and I hope I always remember that you are everything I hoped for and more. 


Sunday, June 23, 2013

Windows, Windows, Windows

Last weekend I finished and Tom hung up the new valances in the bonus room. When we moved in seven years ago, there were some craaaazy window treatments that came with the house. At the time, I was thrilled just to have something covering all the windows, but I was soon completely unimpressed with the orange corduroy roman shades and heavy gold drapes.  

I updated the downstairs treatments fairly quickly, but it has taken a while to get to the rest of the house. Lately it seems like we've been going crazy for windows. The new bonus room valances are made from the fabric I got on mega clearance at JoAnn's last year year and the inside of the side pleats are leftover scraps from the headboard project. All done for less than $20. Score!

 
I made a similar valance for the kitchen with some fun fabric from Hawthorne Threads. It has a cute baking theme and the aqua stripe along the bottom matches my KitchenAid. The inside of the pleat is a sunny yellow polka dot. It's the kind of pattern that makes me smile when I look at it. I may make something similar for the sliding glass door.


And finally, I've been helping my awesome friend Janet with some window treatments for her house, including new valances for her family room and also a valance for her son's room. For these we used the simple method of stapling the fabric to boards and using hem tape on the bottom. They mount to the wall with simple L brackets. Only minimal sewing - and that was just to seam two pieces together to span her large window.


Lots of impact for not a lot of money. My kind of project!

Friday, June 21, 2013

Take That, You Wascally Wabbits!


(Insert trumpet sound) Presenting our new veggie garden beds! Ta da! Aren't they beautiful?

We've had a problem around here with some pesky little bunnies eating up anything green in the backyard. And now we think we may have a nest of baby bunnies brewing in the back. Lovely.

I've pondered a few different solutions - ranging from tolerating them to calling in the marines - and finally settled on a couple raised garden beds as the most humane and least taxing option.

Here's the before pic of the back of the yard where the garden is...


As you can see, it had become a dried up mess where no one wanted to be, except for a little girl and her shovel.


We used some plans from Ana White (that site is amazing!) and headed to Menards for supplies. The corner posts and a few of the end pieces are actually leftover boards from when we built the deck seven years ago. The rest are cedar fence boards - this is the cheapest way I've found to do it.  Add in a roll of chicken wire and some landscape fabric (or cardboard would likely work too) and you're in business for about $30.

I mentioned the plans to my father-in-law Tom, who loves a good project as much as I do. So he came over one Sunday and we put them together. (And by "we" I really mean Tom, although I did do my best to stand around and look helpful.) Just screw them all together and wrap and staple with chicken wire. It took less than an hour.


Then we had a couple yards of garden-blend topsoil delivered and my hero of a husband helped me by moving most of it to the backyard. I did a royally good job of ordering WAY too much, so kudos to Ben for moving a lot more than he should have had to.


Later in the week, I took a trip to the little garden store around the cornerand bought some plants. We now have tomatoes, cucumbers, green beans, a pumpkin, basil, sage, parsley, lemon balm and dill growing in the back.


I've seen the bunnies visit the new garden a few times, but so far they haven't eaten anything. I also got a bottle of some organic bunny repellent and sprayed the perimeter of the boxes and the plants on the ground. 


I'm looking forward to all the yummy veggies coming in a few weeks!