Tuesday, June 12, 2012

Dining Room Rehab: Fabric-Backed Cabinet Tutorial

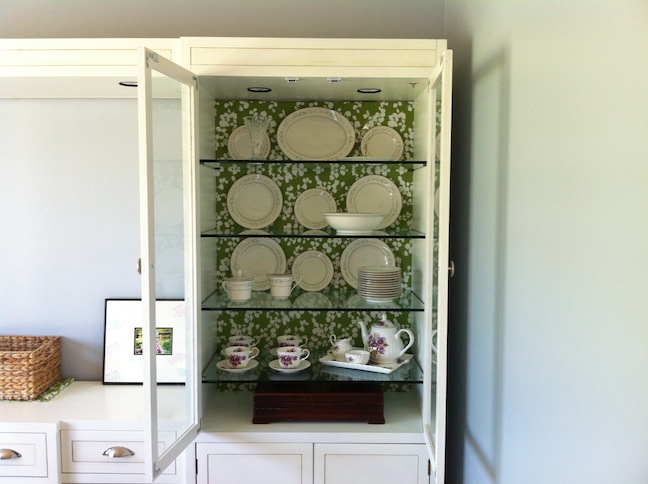
I'm very excited to share with you one of my favorite parts of our dining room rehab - covering up the mirrors behind the china cabinets.

I've noticed that the more you stare at something, the more you get used to how it looks in a space. You almost stop seeing it and you lose sight of what it could be. So at first, I thought about leaving the cabinets mirrors as is. I thought if we updated the glass doors and all the hardware, maybe that would be enough. I'm all about starting small and taking things one small project at a time.

But after many more nights of sitting and staring at those 1980s mirrors, I decided it was a cheap and easy update and if I didn't like it, it was easy to remove. So I went for it and I love how it turned out.

Here's how I did it:


Materials:
Foam core board (enough to cover the entire area in one piece. Available at craft stores. If they don't have it large enough on the shelf, ask in the frame department. They carry larger pieces for about $10 each)
Fabric (enough to cover the area with no seams and enough to cover the foam core with at least four inches of overlap on each side. My fabric was 54 inches wide so I only needed two yards.)
Spray adhesive
Glue dots or Zots

Tools:
Rotary cutter
Cutting mat
Yardstick and measuring tape

Cost: About $40 - $20 for foam core, $12 for fabric, $8 for adhesives

Time: 2-3 hours

Step 1: Take precise measurements of the back of your cabinet. Mark out these measurements on the foam core. I made marks on a yardstick to help ensure an accurate transfer to the foam core.

Note: I was fortunate that my shelves were removable, meaning I could use one continuous piece for the entire cabinet. If your shelves are fixed or attached to the back wall, you may need to do multiple pieces.

Step 2: Use the rotary cutter to cut the foam core board down to size. I used a yardstick to ensure a straight cut. Be sure to place the cutting mat underneath the board to prevent scratching the surface underneath.


Once the board is cut, it may help to place it in the cabinet to ensure a snug fit. Remember that it's always easier to cut smaller if needed than to wish you had more!


Step 3: Lay out the fabric face down on a large, flat work surface. Place the foam core on the fabric, taking into account any nap, grain or pattern in the fabric.


Step 4: Working one edge at a time, spray the edge of the foam core with spray adhesive and fold the fabric over on to the foam core, being sure to keep the fabric straight and tight.


Step 5: Fold the corners over like if you were wrapping a package. Use a glue dot to secure the corners.


Step 6: Continue working your way around until all the excess fabric is wrapped around the back of the foam core and glued in place. Use glue dots as needed to ensure the fabric is securely attached to the back of the board.


Note: I thought about using spray adhesive on the front of the board to secure the fabric in place. The fabric that I bought, however, was very thin, and the glue soaked through and left a mark. So, if you want to go this route, be sure to test an area first to ensure it won't stain.


Step 7: Once the glue has dried, place the board in the cabinet. If your measurements were close enough, it should fit snugly without any adhesive. If things are a little loose, you could use a removable glue dot in each corner to secure things in place. Once you put the shelves in, that may also help hold things in place.


Step 8: Stand back and enjoy your work!


The neat thing about this project is you can easily swap out the fabric depending on the season, your decor or your mood. Unlike paint or wallpaper, there is very little commitment. Just pull the foam core out and re-wrap with whatever fabric you'd like.

Here's how it looked before we painted...


And here it is now, with gleaming china in place. Love it!

Saturday, June 9, 2012

N is for Naomi!

Have I mentioned that it is baby central around here lately? There are people having babies all over the place. You just never know who is going to be next :)

So, another friend of mine had an adorable baby girl recently, and I had the privilege of adding a little something to her beautiful baby room. The room colors are lavender and red - so pretty!

I put together another yarn-wrapped letter for baby Naomi and added some felt flowers and buttons. And while it took me WAAAYYYY longer than it should have, I'm happy to show you how it turned out!


Dining Room Rehab: Updating the Glass Doors

As part of our dining room re-do, we wanted to update the glass doors on the furniture we bought on Craigslist. As a reminder - here's what they looked like when we started. Not the worst in the world, but definitely not the best either!


We looked at two options - either gluing wood pieces of molding to the existing glass, or creating an entirely new set of doors with new glass. We ultimately decided on the second option - putting wood frames around new pieces of glass. The first option probably would have been easier and less expensive, but we thought the results would have looked a little more DIY. So, we went with the harder, more expensive option and I'm really glad we did! I love how the new doors turned out.


We started with about a half dozen 1x2 inch x 6 feet oak boards. (TIP: at the hardware store, go through all the boards to get the straightest ones - there were some very warped boards there!) We cut the boards to size, making a 45 degree cut on each end. (And by "we", I really mean my dad, who was gracious enough to do all this work during his vacation while I watched and pretended to be helpful.)


We used my father-in-law's table saw to cut a groove down each board, wide enough to snugly accommodate the width of the new pieces of glass. There was quite a bit of math going on at this point, as we took into account the width of the boards, the size of the glass, and the depth of the groove to make sure it would fit into the space correctly.

We visited a local glass shop and had them cut four new pieces of glass for us. They were also the ones who were able to tell us that the existing glass was tempered and couldn't be re-purposed. I didn't know this, but apparently once glass has been tempered, it cannot be easily re-cut.

Once we had all the wood pieces cut and grooved, we applied a small line of silicone down the groove and slid the glass in place. We also put some wood glue in the corners and set everything with some corner clamps to make sure it was all square. After the glue had dried a bit, we hammered in some finishing nails in the corners and added L brackets for extra stability.

We picked up some new hinges and hung them in place and added some new knobs. All told, the project cost about $120 for the wood the glass and various supplies. But what a difference!


Now at this point, I still wasn't sure whether we were going to paint everything white or just stain the doors to match the wood finish. (I don't know what I was thinking!) So, if I had the foresight - or the decisiveness - we would have painted these boards before assembling the frames. It would have been easier in the long run. But we didn't. So they were painted after the fact.  How fascinating.


At that stage in the game, I was already in love. Four beautiful new doors completely updated for this century. But here's how they look now, with new paint, new knobs, new backing and lots of sparkling china.  I am in LOVE!


Tuesday, May 29, 2012

Before and After: Dining Room Furniture!


A few months ago we scored some pretty awesome furniture from Craigslist. It looked like 1987, but I thought it had good bones and great potential. And for $300 for a whole wall of storage, it was worth the gamble. Today I'm thrilled to show you the finished project!

This big project had many mini-projects, which I will outline in a few additional posts, including: updating those hideous glass doors with some framed wood ones; adding fabric panels to the back of china cabinets; painting the dining room walls; sanding, painting and glazing all four pieces; and updating all the hardware with something more modern.

And I know this blog is all about how you should try new things yourself and all, but I had some serious help from some extremely talented people to pull this all off. In fact, I'm pretty sure they did more of the work than I did. But part of doing something yourself is knowing when you can't!

So here's another look at the before. Notice the lovely glass doors, those supremely tasteful brass-ish drawer pulls, and that beautiful orangey-oak color. Lovely! But EIGHT drawers! FOUR closed cabinets! EIGHT additional shelves behind glass doors! SEVEN hard-wired lights! Not to mention that this baby was built to last a lifetime - just ask the wonderful people who had to move it!

And here is another look at the after. It's like a breath of fresh air, isn't it? I really could not be more thrilled with the finished look. It is exactly what I had in mind when I saw the Craigslist post back in February and dragged my wonderful husband an hour away to check it out.
So here it is again, before and after side by side. It's hard to believe it's the same thing! What do you think? 

Ahoy! It's a Boy!

 Earlier this month, we traveled to Oregon to spend some time with family and celebrate at a good friend's baby shower. She asked me to make the cake for her, and of course I agreed!

The shower had a nautical theme, so we decided on a cake with some waves and banners, and a boat topper. I again made my own fondant using powdered sugar and marshmallow. I used bunnywoman's recipe from the Wilton forum web site and I borrowed a KitchenAid mixer from a friend in town.

I did find that if you simply double the small batch recipe, it gets very sticky. In the future I'll halve the large batch recipe like I've done in the past. It works much better. So the dark blue was a little stickier than I would have liked and I think if it weren't so sticky, the waves would have been a little more crisp. Alas, I think it still looked pretty good.
The cake itself was lemon poppyseed, with a raspberry buttercream filling and a lemon buttercream frosting on the outside. I stacked three 10 inch rounds with filling in between each. I used some of my mom's raspberry jam in the filling and it was delicious! I put a little bit of clear vanilla in the fondant just to make it taste better.

The topper was made out of cardstock with white glitter stickers and attached to the cake using kabob skewers. The cake looked great, tasted even better and the shower was so much fun celebrating the baby boy coming in a few weeks!

Tuesday, May 1, 2012

L is for Lucy!

We've had the pleasure of meeting quite a few new baby girls around here these days, which means lots of new reasons to do fun craft projects.  I saw a very cute yarn-wrapped letter on Pinterest and put one together for my friend Mary's new baby girl Lucy.

I used a cardboard letter from Hobby Lobby, one skein of turquoise yarn, a few pieces of felt, a couple buttons and some embroidery floss. The whole project was less than $10 and took 3-4 hours. Not bad at all!

To wrap the letter with the yarn, I started with the ends and the corner. I cut a bunch of strips of yarn and then used tacky glue to wrap them over the ends. Then, I started wrapping the longer portions, scrunching it all close together as I went along. I think I wrapped everything twice to ensure even coverage all around. I finished it by gluing the end of the yarn down on the back side.

For the flowers, I used a rolled flower technique. (Just google "felt flowers DIY" - there are tons of tutorials out there.) Basically you cut out a circle, and then cut a spiral into the circle piece. Roll up the strip, glue the end and that's it. I added a couple pieces of green felt for the leaves, and hot glued it all in place.


For the birdies, I created a paper template and then cut out pieces of felt. I stitched on the wings to the front piece first, and then used a blanket stitch to piece it all together. (I really appreciated the tutorial posted HERE.) I also put a layer of batting in the middle to give it some fluff, and then stitched on the eyes. I probably should have put the eyes on before putting it all together, but didn't think that far ahead.  I made an easy twig, and then another rolled flower to give it some more color. Then I glued it all together to the yarn.


I'm currently working on a red and purple on one for another beautiful new baby girl - I love how these come together and they look so cute in a new nursery!

Friday, March 16, 2012

Using the Nailhead Trim Kit


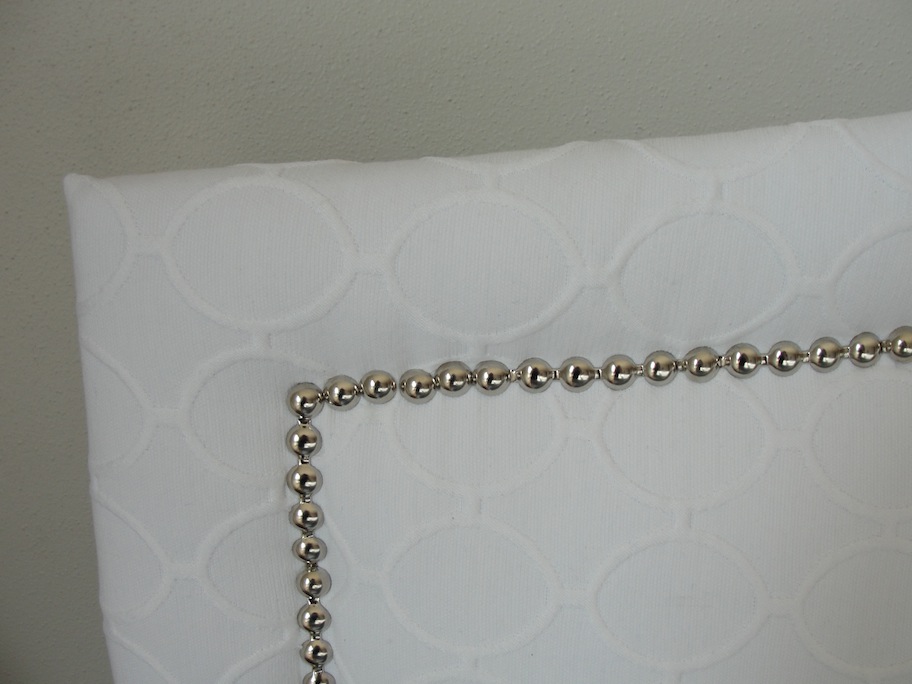
When we made our upholstered headboard, we used a nailhead trim kit. The beauty of this product is that instead of it being individual nails that you tack in one by one, it is trim on a spool like ribbon. You only have to use a tack in every fifth "nail", saving you lots of time and agony. And, it helps keep your lines straight.
 
I scoured all the local craft and hardware stores in town and eventually ordered it online from Beacon Fabric. I called them to discuss the different color options and they were very helpful. I was originally looking for Pewter, but they don't carry it any more due to quality control issues. So we went with Nickel. I think it was around $30 once shipping was included and I used about half the roll.


Here's how we did it.

Materials:
Upholstered headboard
Nailhead Trim Kit

Tools:
Ruler
Straight pins
Nylon-tipped hammer or rubber mallet
Flathead screwdriver


Optional prep step: Find a scrap piece of board and practice tacking in a small strip. This will help you get the feel for the trim and make sure you like how it looks.


Step 1: Determine where on your project you want the nailheads to go. We measured in from the edges around two inches for our headboard.


Step 2: Unroll the trim, trimming pieces equal to the length of each side. You can see in the before and after pictures - it comes off the roll a little round. Use your kitchen counter or a board to flatten it out. This will help keep things flat and straight when you start tacking down.


Before
After
Step 3: Use the ruler and straight pins to pin the trim where you want it to go. Place a tack hole at the point where you want to start. I suggest starting with any straight edges. We started in the upper right and upper left corners, doing the sides of the headboard first, before attempting the curve on top.


Step 4: Have one person hold the trim down, tight and flat. Place a tack in the hole and tap it in with a nylon or rubber-tipped hammer, trying to get the tack in as straight as possible. Make sure the hammer is clean! You want the tack to completely cover the trim. The nice thing about this trim is how easy it is to adjust a line if it is crooked. You just pop up the tack with a screwdriver or other flat metal object and then re-tack it in a new position. The tacks do bend easily, so you'll likely have a pile of oops tacks, but we still had plenty to get the job done.

Keep pulling the trim tight and flat while you work across the project. Don't forget to measure each time before you tack.
Use the pins to help keep things in line, but be sure to hold everything firmly in place when you hammer!


Step 5: When we got to the bottom, we wrapped the trim around the bottom of the headboard and tacked the final nail into the back. This helped give it a finished look, and covered up the tiny raw edge left over from the upholstering.


Step 6: To begin the top curve, we started with a fresh tack just to the side of the row we just did. It looks slightly different than the rest because there isn't a small metal connector there, but from far away you don't notice it at all.


Step 7: The curve is a little trickier. We slowly worked our way up and down, making sure to measure along the way. We originally hoped that we could end that line on a tack hole, so that we wouldn't have extra trim that was loose, but we couldn't make the spacing look right. So, we simply tacked down the end of the trim, then pounded in a few extra loose tacks to finish the line. I am a bit of a perfectionist, so this took a few tries. I can still see where things could move a millimeter or two to make the line straighter but you can drive yourself crazy if you keep adjusting it all day.


And here is how it looks with all the trim in place.

The perfectionist in me sees a couple crooked tacks, but overall not bad!


I am so happy with how this turned out and I love that my mom, dad and I did this together. This was a fun project and certainly something you could do!

The finished headboard!