Thursday, January 17, 2013

Fabric Bins for the Nursery

I am a huge fan of open storage. I like to be able to throw something in a bin easily and not worry about taking off or putting on a lid. (I'm lazy, I know.)

Both kids have the ClosetMaid Cubeicals in their closets to store books and other things. There are lots of storage options for these, but I've never liked how their fabric bins take up the entire square. It makes it difficult to just chuck something in, or to see what is in the bin from far away. I am both a slob and obsessive about organization, so I need something that can be organized chaos.


I found this great tutorial for fabric baskets and thought I could adjust the measurements to fit the Cubeicals. It was important to me that it was wide enough to fit a tub of wipes and a stack of diapers, and short enough to leave some room when put in the Cubeical. I also wanted something that could serve as a diaper storage bin for the top of the changing table when needed, but be able to be put away in the Cubeical when not in use.


Here are the measurements I used (replacing what is in the tutorial link above) -

Exterior Fabric - 2 pieces 11"x10", 1 piece 12"x29"
Interior Fabric - 2 pieces 11"x6.5", 2 pieces 12"x6.5", 1 piece 13"x14"
Interfacing - 2 pieces 11"x10", i piece 12"x29"

I used a combination of sew-in and iron-on interfacing, mainly because I didn't know what I was doing when I went to the fabric store. Having used both - the iron-on is a lot easier, but more expensive. The sew-in isn't hard, but takes a little more effort. Just make sure you baste it in so it's easier to take out if you screw it up. (This is experience talking here.)

I used some foam core I had lying around for the bottom piece, and some old ribbon for the handles. If I were doing it again, I would probably use something a little sturdier so they would stand up better.

I was only going to make one, but they were so easy I ended up making three. With basic sewing skills, I'd say this takes 3-4 hours each. I did the second and third simultaneously, which helped speed things up a bit.


 Want to customize this for yourself? Here's the formula I used to determine what size fabric I needed to cut.

For the exterior fabric:
2 of these: (Finished Width +1 inch) X (Finished Height + 3 inches)  (for the front and back)
1 of these: (Finished Depth + 1 inch) X (2xFinished Height + Finished Width + 5inches) (for the bottom and sides)

For the interior:
2 of these: (Finished Width + 1 inch) X (Finished Height - 1/2 inch) (for the front and back)
2 of these: (Finished Depth + 1 inch) X (Finished Height - 1/2 inch) (for the sides)
1 of these: (Finished Width + 3 inches) X (Finished Depth + 3 inches) (for the bottom)

Interfacing: Same formula as the exterior. 


Wednesday, January 16, 2013

The Perfect Quilt... and Mitered Blanket Binding for Dummies

I don't know about you, but I am thrilled it is January. We had a whirlwind November and December and we are all craving normalcy around here. Maybe because I haven't slept for more than a four hour stretch for the past two months? Just a thought.

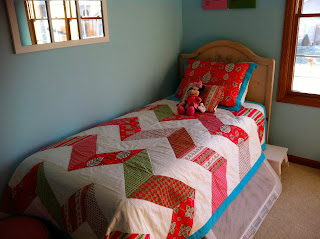
But anyway, Mom and I have been working on a quilt for my daughter's room, and this past weekend, we finished it! I love love love how it turned out, and E does too. It is just perfect for her room. Ever since we put together her awesome baby girl nursery, I've been hoarding scraps of the fabric (from Michael Miller's Whimsy collection) to use on her big girl bed. Now the bed matches all the other pieces from her nursery - the window valance, rocking chair pad, doll cradle blanket and pillow and an additional throw pillow.

I only had a half a yard or so of about eight different prints, so we chose a chevron pattern so we could use all the different fabrics. Mom found a great white on white print to use as the base and used this triangle method to create the chevron. I should mention that Mom did 90% of the work here, maybe more. These projects always start with me saying something like, "I'm thinking of doing this... it looks easy enough" and end with Mom staying up until 3 a.m. hand stitching a blanket binding. So kudos to Mom for her sewing skills and willingness to participate in my crazy ideas.

Speaking of the blanket binding, one of the things that stumped us was how to do mitered corners that didn't leave seams somewhere. We watched and read quite a few tutorials online, and quite honestly, they were more confusing than helpful. But after much trial and error, we figured out our own way to do it. And since we both agreed that I'll probably call Mom with a crazy idea for another quilt in a couple years, we had better write this down. 

So here goes...

First, determine how wide you want your binding to be (we went with 2 inches) and quadruple it. Cut four strips, equal to the length of each side, plus a half inch or so on each end. Our strips were 8 inches wide.  First, fold over the ends about a half inch to hide the raw edge. Fold in half and press in a seam. Then fold the edges into the middle and press again. It should look like this.


The nice thing about our method is that you're not actually mitering corners. Instead, you're sewing down two edges, and then sewing on two more edges that have diagonal ends. So for two of the (opposite) sides, you stitch on the binding like you are putting on bias tape. Just make sure your edges are folding in so you don't have any raw edges.


Now, for the mitered sides. Take another strip and fold it like pictured here.


Place it on your quilt like this.


The right side is the raw edge of the quilt. Machine stitch the entire length of the binding in place from where you see the black pins (the fold on the far right).  Then turn the rest of the binding over on itself. You can see here how it creates your first miter. Hand stitch the diagonal in place. Mom says to use an invisible stitch.


Now flip the entire blanket over, and fold the remaining loose binding down on the other side. This will create the miter on the back side. Hand stitch the corner and entire length of the binding. (You could probably use the machine if you don't mind a visible seam on both sides, but again, mom and I are perfectionists.)


Repeat this three more times and you have a perfectly mitered blanket binding. Ta da!