Showing posts with label kitchen. Show all posts

Thursday, February 14, 2013

Happy Valentine's Day!


It wouldn't be Valentine's Day without something yummy to eat. We have a weakness around here for the salty/sweet combo. This year, E and I whipped up some dipped pretzels. (Yet another idea from Pinterest.) We used some vanilla-flavored red candy wafers (about $3 a bag from Michael's or Hobby Lobby) and some Valentine's Day sprinkles for a fun and festive treat.

You just melt the candy wafers in the microwave, dip the pretzels in the candy and then dip again in a bowl of sprinkles. (I added a teaspoon or so of vegetable oil to the candy wafers after melting to get the consistency I was looking for, and I think it helps them not harden so quickly.)

Set them on some waxed paper for about a half hour for the candy coating to harden. Yum, yum! Super easy and a fun project even the 2-year-old can help with.

Monday, October 22, 2012

Steaming a Pumpkin

Fall is officially here, and while I'm crazily nesting as we await the impending birth of The Boy, I thought I'd give you a quick overview of how I stock the freezer with pumpkin every fall. Like many other foods of my childhood, pumpkin never came from a can. Because if you can get it fresh, you should buy it fresh.

We took the little Bugaboo on her first pumpkin patch excursion this year. She picked out two "baby pumpkins" and we steamed them at home to use for our Thanksgiving and Christmas pies, breads, muffins and other goodies.

Here's the simple how-to overview for steaming a pumpkin: Cut it up. Get rid of the guts. Throw it in the steamer. Remove the skin. Mash it up. Use it in your recipe in place of canned pumpkin.

For those that like a little more guidance - here's some more thorough instructions.

Step One: Put that canned pumpkin back on the shelf and head to the produce section or the pumpkin farm, where real pumpkin can be found. Pick out one of those little pumpkins, sometimes called pie pumpkins. I have no idea what makes one pumpkin better than the other but I usually go for smooth skin and good orange color. One small pumpkin should give you about two cups or more of pumpkin.


Step Two: Cut off and discard the stem and cut the pumpkin in half. Keep the skin on. Cut the pumpkin up like you would an apple or a melon and scoop out all the nasty guts and seeds in the middle. Try to scoop or slice enough out so that you don't have a lot of strings behind.

Step Three: Put the pieces in your electric steamer. I learned early on that this is way easier than using the pot and steamer basket method. (And cheaper too if you kept burning up pans like I did!)


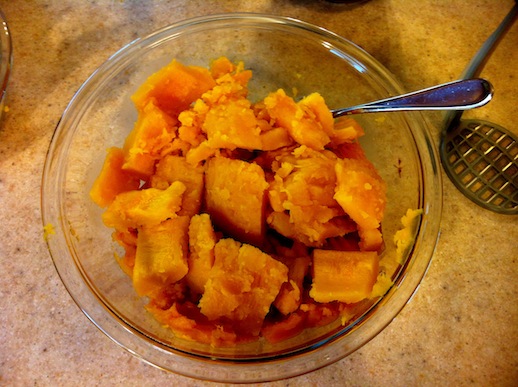
Step Four: Add water to the steamer, turn it on and let it do all the work. Mine takes about 30 minutes for two small pumpkins. You know your pumpkin is done when the flesh will easily separate from the skin. Stick your fork in and twist a little. It should easily come off of the skin (like in the picture above) and mash up easily. If you find it is still a little tough or crunchy, just give it a couple more minutes to steam. This will also help with the next step if you're (like me) too lazy to get out the blender.

Step 5: Use a fork to slide the pumpkin away from the skin. Throw the skins away. See how easily it separates when it's thoroughly cooked? Use a potato masher or a fork (or a blender for best results) to mash it all up.


Step 6: I like to measure out how much I need for each recipe before I freeze it. Mom's pie recipe calls for 1 1/2 cups of pumpkin, so that's what I put in each Ziploc container. Then I just stick it in the freezer until I need it. 


It tastes so much fresher than the canned stuff and is not that difficult to whip out ahead of time. Then when you need it, it's just as easy to pull it out of the freezer as it is to find your can opener. Tastier too!

Monday, October 1, 2012

Best Snack Mix Ever

I have a major weakness for candy corn. The stuff is so good and so addicting. (And like conversation hearts in February, it MUST be Brach's brand. Nothing else measures up.)

Years ago the fam decided to fatten up the snack some more by adding in a couple of our other favorite things - semi-sweet chocolate chips and salted peanuts.

Just dump it all in a bowl and shake it up so the salt from the peanuts gets on the candy corn and chocolate. It creates the perfect blend of salty sweet goodness. Yum, yum.

Friday, September 28, 2012

Easy Low-Sugar Freezer Jam

I've never been a fan of most jarred jams. They taste too sugary and gritty for me. I grew up on homemade jam from fresh raspberries and was never able to make the switch to the mass-produced stuff. Since moving away from home, I've settled for Smuckers Organic Raspberry Preserves, but it still isn't the same as the homemade stuff. 

I recently discovered a local berry farm that has raspberries. Hooray! And better yet, the raspberries are ripe around September. So after my blueberry and blackberry fix in July and August, I get to binge on raspberries. Score!

I took my daughter to the raspberry farm a few weeks ago and we picked a few pints. Most ended up in her stomach before we left the farm, but I did save enough to make a batch of freezer jam. Most jam recipes have TONS of sugar in them, often more sugar than berries. That seems just plain wrong to me. So here's Mom's low-sugar recipe, which uses considerably less sugar and still gels nicely. And in my opinion doesn't taste low-sugar at all. Best yet, it is super easy and only has four ingredients!


LOW SUGAR FREEZER JAM

  • 3 cups crushed raspberries, strawberries, boysenberries, blackberries or marionberries
  • 1 box pectin (just the regular stuff, not the low-sugar recipe stuff)
  • 1 ¾ cups sugar
  • 1 ½ envelopes unflavored gelatin


Measure berries into 3-quart pan. Sprinkle with pectin. Stir and let stand 30 minutes. 


 Stir in sugar.

Dissolve gelatin in ¼ cup warm water. (Not really quite sure the best way to measure the 1/2 packet of gelatin, so I just cut the packet in half and eye-balled it.)
 

Bring berry mixture to just under a boil, stirring constantly. Remove from heat. Add gelatin and stir.

 Pour into freezer containers and cool. Refrigerate or freeze. Makes 4 ½ cups.

Note:
This recipe can be doubled, tripled, or made with as many as 27 cups of berries at a time.

Thursday, September 6, 2012

September Already?

I saw a school bus go down the street yesterday. How did that happen? Seems like the summers go by so fast around here.

There's been a lot going on around here. At the beginning of the summer, I put together a quite ambitious project list, and I'm happy to say that (with a LOT of help) we've knocked out most of it.
I've also decided that when I say that I can do something, it's ok for that to mean that I can ask or pay someone else to do it! Because at the end of the day, sometimes it just needs to get DONE!

Here are a few of the projects...

New Deck Lattice
My brother is a talented deck builder in Portland, Oregon, and when we bought our house a few years ago, he flew out to Wisconsin and built us a gorgeous deck. Fast forward a few years, and we now have both a toddler and a family of wild bunnies in the neighborhood who are very curious about what goes on under the deck. So we put up some lattice around the bottom to hopefully keep curious critters at bay. Not that I actually did any of the work. My father-in-law did it all. I supervised :)


And the finish on the deck will be restored to its former glory before the end of the summer. It is in desperate need of re-staining, but the deposit check has been mailed!

New Painted Dresser
A while back it seemed like we needed furniture in every room. Dressers, kids furniture, etc. Then we scored some deals on Craigslist and at the Elkhorn flea market. Now it seems like we have more furniture than we know what to do with and we're constantly moving it around from room to room.

As part of the Great Furniture Shuffle of 2012, I found this great antique dresser at the flea market. I loved the look of it, it was in decent shape, the drawers slid pretty well, and it was only $60! for the dresser and mirror.


I thought about trying to fix this one up myself, but alas, I am pregnant and tired. So I wisely decided to have Jorie at 63rd Avenue do it for me. (She's also the one who painted our awesome dining room furniture!) She used Annie Sloan Chalk Paint in Aubusson Blue and then hand painted the white based on a design I gave her. Then the whole thing has a coat of clear wax to seal it.


And here's how it turned out! I love it! The mirror is also blue now too, we just haven't gotten around to putting it back up yet. Although I may wall mount it instead of mounting it to the back of the dresser. We'll see.

Martha's Fabulous Pumpkin Cookies
The other day I found some pumpkin in the freezer from last fall that I needed to use up, so I made these cookies off the Martha Stewart web site. They are amazing. Drop everything and go make them now. Seriously, do it. You will not be disappointed.


I'm working on putting together a new project list for the fall - can you tell I'm nesting? So far, there's the boy's room to work on, some window treatments for the guest room and the kitchen, and a makeshift mud room for the garage. Oh yeah, and I'm sure rearranging more furniture. Why not? If it all gets done this fall, I will be so thrilled! Coming up next on the blogosphere, a preview of the boy's room so far, a quick and easy (and low sugar!) freezer jam recipe from Mom, and maybe a few simple projects I've been doing with E. Stay tuned!

Wednesday, August 31, 2011

A bug-tastic birthday bash

Last weekend we went to Minnesota to celebrate my nieces' birthdays. They were having a nature-themed party, so I wanted to make them a special cake. They requested frogs and ladybugs and drew me a picture of what they wanted the cake to look like.

 My nieces were great helpers and they added a lot of great touches to the cake. They were especially great at cutting out all the circles for the ladybug's spots and the frog faces and making the grass border on the bottoms of the tiers.

As an added unexpected surprise, we added a different food coloring gel to each layer to create a rainbow cake on the inside. 

Overall, I think the finished cake turned out great!

Tuesday, August 30, 2011

More pickles!

When I was a kid, one wall in the garage was dedicated to my mom's canning jars. She would can all kinds of things - peaches, tomatoes, cherries, applesauce, etc. and we would get to eat the fruit year round. Since I have all this extra produce from my garden, I thought I'd try canning some pickles.

I ordered this handy-dandy canning discovery kit from Amazon.com. (By the way - Amazon Prime is the greatest thing ever. I never have to leave the house!)

The kit includes a canning rack, three jars with bands and lids and an instruction booklet - for about 10 bucks. The booklet outlines three easy steps - boil water, fill jars, put jars in boiling water.  And voila, instant pickles!

Ok, so it's a little more complicated than that - you have to make sure your pot is deep enough to fully submerge the jars. (Thanks to Mary for lending me her pot.) And you need to make sure that you have the right amount of space in the top of your jars before you put them in the water. And you have to boil the jars for the right amount of time. But this is not rocket science.

For the brine, I used the Ball dill pickle mix recipe from the side of the mix container. Super easy. Pour the brine over the sliced cucumbers, add lids and bands and boil for about 15 minutes. I also threw in a little dill from the garden for kicks.

The mix says the pickles will be best in 4-6 weeks, so I'm looking forward to cracking them open. I have a bunch of tomatoes in the garden now, so I'm thinking of canning some salsa, bruschetta or tomato sauce next.

Saturday, August 13, 2011

Tis the Season

It's that time of glorious time of year that I look forward to all winter long - blackberry season! A few years ago, Ben's wonderful Grandpa Milt passed away. He was an outstanding person and we all miss him very much. One thing we shared was our love of blackberries. Fresh blackberries are difficult to come by in the Midwest, and Grandpa Milt had a berry bush in his backyard.

After he passed, I wanted to make sure that we could still enjoy those summer berries. So, we transplanted the bush into my backyard. It took a couple years of TLC to get it to produce, but we are now enjoying the fruits of our labor. The berry bush is overflowing with ripe, juicy blackberries.

No holiday in the Walter family is complete without a blackberry pie, and it is a tradition I intend to continue. I didn't have quite enough ripe berries yet for a whole pie, so I used this cobbler recipe from Williams-Sonoma and added in some nectarines and a dash of nutmeg as well. I made one for me, and one for Ben's grandma.

I have to say that every recipe I have ever tried from Williams-Sonoma has been a smashing success. I have about seven of their cookbooks and the food is always delicious and the recipes are easy to follow. It looks like I'm going to have a large amount of berries this year, and they have a few other blackberry recipes that I may try this year. YUM!


Friday, July 29, 2011

Picklicious

Until a couple years ago, it never occurred to me that you could make pickles at home. I think I just assumed they were another wonder brought about by the industrial revolution. Brilliant, I know.

Then, Ben's uncle Mike brought some fantastic dill pickles to a family gathering. Oh. my. goodness. So yummy. So, I figured if Mike could do it, I could too!

Last year, I decided to grow some cucumbers and dill and give it a go. Well, the cucumbers were a colossal failure. Not a single cuke emerged. I have this horrible habit of planting seeds way too close to each other so the plants strangle each other and nothing survives. How fascinating.

This year, I expanded the garden and spaced things much better. For the most part at least. The mesclun is a thick mess. But that's beside the point. My cucumbers are growing like crazy!


I also grew some tall beautiful dill. Sometimes I think I plant dill and basil just so I can walk to the garden and smell their wonderful fragrances. 


The pickle recipe is really quite simple. You make a hot syrup by boiling vinegar, sugar, salt, mustard seed and celery seed.


It will look something like this.


Pour the syrup over sliced cucumbers.


I sliced the cucumbers using this handy dandy slicer thingy that I found in the kitchen drawer. I have no idea where it came from but it makes the pickles look fancy shmancy.


Throw in a sliced onion or two and a few dill heads.


Put a lid on it and stick it in the fridge for 3 days to let the pickle magic happen. After three days, open up and enjoy! So easy to make and quite tasty.