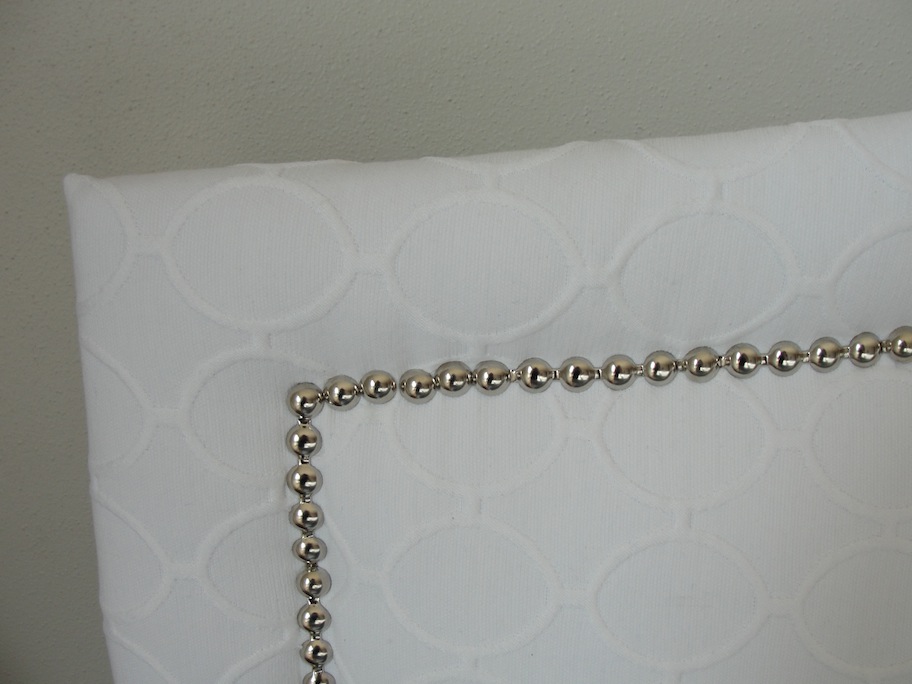
 When we made our upholstered headboard, we used a nailhead trim kit. The beauty of this product is that instead of it being individual nails that you tack in one by one, it is trim on a spool like ribbon. You only have to use a tack in every fifth "nail", saving you lots of time and agony. And, it helps keep your lines straight.
 I scoured all the local craft and hardware stores in town and eventually ordered it online from Beacon Fabric. I called them to discuss the different color options and they were very helpful. I was originally looking for Pewter, but they don't carry it any more due to quality control issues. So we went with Nickel. I think it was around $30 once shipping was included and I used about half the roll.


Here's how we did it.
Materials:
Upholstered headboard
Nailhead Trim Kit
Tools:
Ruler
Straight pins
Nylon-tipped hammer or rubber mallet
Flathead screwdriver
Optional prep step: Find a scrap piece of board and practice tacking in a small strip. This will help you get the feel for the trim and make sure you like how it looks.
Step 1: Determine where on your project you want the nailheads to go. We measured in from the edges around two inches for our headboard.
Step 2: Unroll the trim, trimming pieces equal to the length of each side. You can see in the before and after pictures - it comes off the roll a little round. Use your kitchen counter or a board to flatten it out. This will help keep things flat and straight when you start tacking down.
 |
| Before |
 |
| After |


Step 4: Have one person hold the trim down, tight and flat. Place a tack in the hole and tap it in with a nylon or rubber-tipped hammer, trying to get the tack in as straight as possible. Make sure the hammer is clean! You want the tack to completely cover the trim. The nice thing about this trim is how easy it is to adjust a line if it is crooked. You just pop up the tack with a screwdriver or other flat metal object and then re-tack it in a new position. The tacks do bend easily, so you'll likely have a pile of oops tacks, but we still had plenty to get the job done.
Keep pulling the trim tight and flat while you work across the project. Don't forget to measure each time before you tack.
 |
| Use the pins to help keep things in line, but be sure to hold everything firmly in place when you hammer! |
Step 5: When we got to the bottom, we wrapped the trim around the bottom of the headboard and tacked the final nail into the back. This helped give it a finished look, and covered up the tiny raw edge left over from the upholstering.

Step 6: To begin the top curve, we started with a fresh tack just to the side of the row we just did. It looks slightly different than the rest because there isn't a small metal connector there, but from far away you don't notice it at all.

Step 7: The curve is a little trickier. We slowly worked our way up and down, making sure to measure along the way. We originally hoped that we could end that line on a tack hole, so that we wouldn't have extra trim that was loose, but we couldn't make the spacing look right. So, we simply tacked down the end of the trim, then pounded in a few extra loose tacks to finish the line. I am a bit of a perfectionist, so this took a few tries. I can still see where things could move a millimeter or two to make the line straighter but you can drive yourself crazy if you keep adjusting it all day.
And here is how it looks with all the trim in place.
 |
| The perfectionist in me sees a couple crooked tacks, but overall not bad! |
I am so happy with how this turned out and I love that my mom, dad and I did this together. This was a fun project and certainly something you could do!
 |
| The finished headboard! |
IT LOOKS SO PROFESSIONAL! I LOVE IT!!!
ReplyDeleteIT LOOKS SO PROFESSIONAL! I LOVE IT!!!
ReplyDeleteI used a 2" foam plus batting on pegboard. Are the nail long enough too reach the pegboard?
ReplyDelete