Showing posts with label party. Show all posts
Tuesday, February 4, 2014
Reusin' Stuff
Have I mentioned how much I love reusing stuff? Remember that candy machine I made for E's birthday a couple years ago? I'm happy to say it's been getting some use lately. Some paint, tinfoil and cardstock, and we transformed it into a rocket ship for J's b-day and a Mickey for E's b-day.
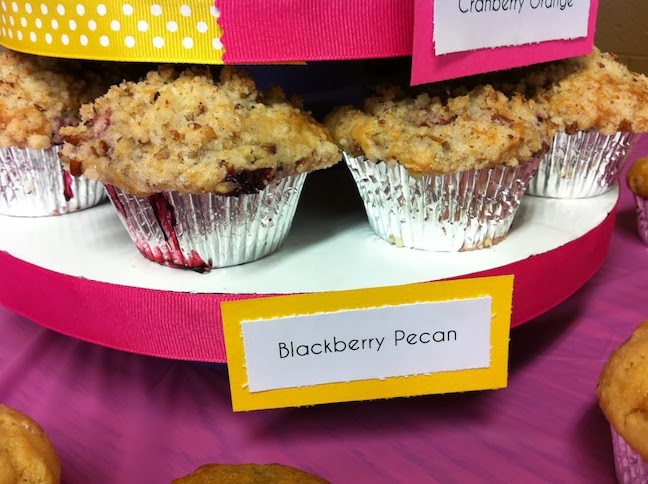
And remember the muffin tower I made for a friend's baby shower? It became the a Mickey cupcake tower for E's b-day too. Just swap out the ribbon, paper and treats and we're in business.
Cheap and easy - just the way I like it.
Wednesday, January 29, 2014
We've Got Ears, Say Cheers!
In November, J had a rocket birthday. When E found out, she wanted a rocket party too. But not just any rocket party. It must be a RED rocket party. Whatever that means. Well, I wasn't really in the mood to repeat the rocket theme three weeks later for her b-day. So naturally, I went on the offensive. For weeks, I tried to convince her that she wanted to a have a Daniel Tiger party. This was an entirely selfish request, for I really just wanted to make a trolley cake. Wouldn't that be adorable?
Well, eventually I got her to cave. But not on the Daniel Tiger part. Instead, she said she wanted a Mickey party. With Mickey cupcakes and balloons. This I could handle.
And since E isn't really a fan of big parties anyway, we kept it small and sane. Not the way I usually do things, but I'm starting to see the wisdom in simplicity. (Namely, that simplicity = more sleep, and I LOVE sleep.)
So, we did a cupcake tower, some Mickey candy bowls, a Mickey banner, and some Mickey cookies. And considering her b-day party was two and half weeks before Christmas and two days before a big church event I was helping with, we managed to pull it off and stay sane. And have some Mickey fun in the process. Hot Dog!
The invites...
The cupcake tower...
The banner for the birthday girl...
The Mickey candy bowls...
Well, eventually I got her to cave. But not on the Daniel Tiger part. Instead, she said she wanted a Mickey party. With Mickey cupcakes and balloons. This I could handle.
And since E isn't really a fan of big parties anyway, we kept it small and sane. Not the way I usually do things, but I'm starting to see the wisdom in simplicity. (Namely, that simplicity = more sleep, and I LOVE sleep.)
So, we did a cupcake tower, some Mickey candy bowls, a Mickey banner, and some Mickey cookies. And considering her b-day party was two and half weeks before Christmas and two days before a big church event I was helping with, we managed to pull it off and stay sane. And have some Mickey fun in the process. Hot Dog!
The invites...
The cupcake tower...
The banner for the birthday girl...
The Mickey candy bowls...
Because the Muffin Top is the Best Part
This was really easy to do. I had some pre-cut cake circles (in the cake aisle at Hobby Lobby) and taped three together. I used 6-, 8-, 10- and 12-inch circles. If you don't have any lying around, you could use any cardboard or foam board. I just happen to be a girl who has this kind of thing waiting around for a raining day.
Use a hot glue gun to affix some ribbon to the edges. Then take the tomato sauce cans and cover them with scrapbook paper. Glue the cans in between each set of circles and you're all done. It only took about 10 minutes and I think it made the presentation look a lot better.
Oh, and the muffins were delicious.
Tuesday, January 7, 2014
Blast Off! J is One!
In November, our sweet baby J turned one! (Or as E says, "He's not a baby anymore. He got big.")
A few months ago, I found some cute rocket ship invitations and party supplies on super clearance at Hobby Lobby, and we ran with the theme.
I have this genetic compulsion to go overboard on things, and for my own sanity, I'm trying to break the habit. So we went a little simpler than we did for E's first b-day. But of course, old habits die hard, so we did have a bit of fun!
First up... the food.
We made rocket and star cookies... (I didn't have a rocket cookie cutter, so we used a strawberry cookie cutter upside down.)
...and cupcakes with little paper stars on sticks...
...and of course a cake...
And here it is all together.
For decorations, we used E's candy machines and turned them into rockets...
...A garland with rockets and astronauts, similar to what we did for E (again, I forgot to take a picture!)
It was a great party and the birthday boy had a blast!
A few months ago, I found some cute rocket ship invitations and party supplies on super clearance at Hobby Lobby, and we ran with the theme.
I have this genetic compulsion to go overboard on things, and for my own sanity, I'm trying to break the habit. So we went a little simpler than we did for E's first b-day. But of course, old habits die hard, so we did have a bit of fun!
First up... the food.
We made rocket and star cookies... (I didn't have a rocket cookie cutter, so we used a strawberry cookie cutter upside down.)
...and cupcakes with little paper stars on sticks...
...and of course a cake...
... and some rocket shaped fruit kabobs... (on the left here - I forgot to take a better pic. The stands are dollar store floral foam covered in cardstock.)
And here it is all together.
For decorations, we used E's candy machines and turned them into rockets...
...A garland with rockets and astronauts, similar to what we did for E (again, I forgot to take a picture!)
...And my favorite - a rocket ship photo backdrop so people could take a pic of the birthday boy in a rocket ship. (It is sitting on a music stand. Background paper from Hobby Lobby, hanging planets from Oriental Trading, the awesome rocket made by Maryke.)
And finally, for activities for the kids, we had a rocket building station where they could make their own rocket ships and birthday hats. There was lots of messy, creative fun going on!
It was a great party and the birthday boy had a blast!
Monday, December 10, 2012
Cupcakes for my Cutie
We decided on a cupcake theme, where the guests did their own decorating. That way I just had to whip up some cupcakes (from a box!) and some buttercream (using the awesomely delicious and easy Wilton recipe), throw some sprinkles on the table and call it good!
For the buttercream, I made the basic Wilton buttercream recipe, chocolate buttercream, raspberry buttercream (using my own freezer jam - so good!) and a peppermint buttercream using the basic Wilton recipe plus about 1/2 tsp peppermint extract. This sounds more elaborate than it was - it only took about an hour using my KitchenAid mixer. How did I ever live without it?
I also made a few sugar cookies using my cupcake cookie cutter. I had been wanting to try decorating with royal icing for a while, and while I was too tired to give it my full attention, I think they turned out okay. I read a few tutorials online, and they all said that the consistency of the icing is key to flooding the cookie properly. I think they're right, and I was too impatient to figure it out, so I ended up just smearing the icing around on most of them. Fortunately the icing dried to a nice smooth finish. I'm sure I'll try again when I'm back to sleeping through the night because there's the potential for some really fun designs.
After last year's b-day extravaganza, I saved a lot of the decorations. This year, they all came back out of the basement, making it look like I spent way more time preparing than I actually did. We reused the tablecloths, runners, centerpieces and candy dishes. Score!
Sunday, July 22, 2012
Peace, Love and Zebras
This week Ben's cousin Rachel celebrated her 11th birthday and she asked me to make her a cake for her family party. She asked for a two-tier zebra cake with pink peace signs on it.
I googled "zebra peace cake" to get some ideas, thinking I'd get lots of results for zebra cakes or peace sign cakes. I was surprised to find hundreds of pink cakes with zebra print AND peace signs, most for tween girls. What's the deal with all the zebra peace stuff? Did Justin Bieber wear a zebra-patterned peace sign on national TV or something? I guess I am just out of the tween loop.
Anyway, back to the cake. I saw a neat method on pinterest where you layer chocolate and white cake to get a zebra effect on in the cake. I thought I'd give it a try, which meant baking a lot of cake. Way more than I needed, in fact.
But that's OK. Fortunately I have a couple willing eaters in the house to help me take care of all the excess.
It was pretty warm in the house this weekend, so I was worried about the fondant melting. I typically crumb coat the cakes in buttercream, then put them in the fridge to set before applying the fondant. Then after applying fondant and decorations, I usually put it back in the fridge. I realized today I had been doing things ALL WRONG.
Apparently fondant will naturally acclimate to whatever temperature it is, so as long as it's not excessively humid, the fondant is just fine unrefrigerated. But if you have a cold cake, and you put room temp fondant on it, and leave it out, it will start to sweat while the cold cake warms up. Not fun to work with!
After a while, however, when the cake and fondant adjust to room temp, the cake will dry out and be fine. So if you don't have a perishable filling, keep the cake at room temperature!
Here's the sweaty cake before I realized I shouldn't keep putting it in the fridge.
Oooh, shiny. And when that black fondant gets shiny, it gets messy and the color transfers everywhere. Black-tinted fondant really is a pain, in my opinion.
So this morning, I took the cake out of the fridge and let it sit on the counter for a couple hours. What a huge difference!
The gooey, slimy fondant dried out and became much more stable. Hooray! That means I could apply more disco dust (that's edible glitter!) to all the pink areas. Disco dust and slimy fondant don't get along.
I used a printout of a zebra pattern and a pastry cutter to make the zebra stripes and a circle cutter to make the peace signs. I also used the fondant to make a number 11 for the top. I stuck some toothpicks in them and left them out to dry overnight. There they are on the side.
And here's the final cake all put together.
And here's how the inside looked. Not exactly zebra striped, but close enough.
And tasty too!
I googled "zebra peace cake" to get some ideas, thinking I'd get lots of results for zebra cakes or peace sign cakes. I was surprised to find hundreds of pink cakes with zebra print AND peace signs, most for tween girls. What's the deal with all the zebra peace stuff? Did Justin Bieber wear a zebra-patterned peace sign on national TV or something? I guess I am just out of the tween loop.
Anyway, back to the cake. I saw a neat method on pinterest where you layer chocolate and white cake to get a zebra effect on in the cake. I thought I'd give it a try, which meant baking a lot of cake. Way more than I needed, in fact.
But that's OK. Fortunately I have a couple willing eaters in the house to help me take care of all the excess.
It was pretty warm in the house this weekend, so I was worried about the fondant melting. I typically crumb coat the cakes in buttercream, then put them in the fridge to set before applying the fondant. Then after applying fondant and decorations, I usually put it back in the fridge. I realized today I had been doing things ALL WRONG.
Apparently fondant will naturally acclimate to whatever temperature it is, so as long as it's not excessively humid, the fondant is just fine unrefrigerated. But if you have a cold cake, and you put room temp fondant on it, and leave it out, it will start to sweat while the cold cake warms up. Not fun to work with!
After a while, however, when the cake and fondant adjust to room temp, the cake will dry out and be fine. So if you don't have a perishable filling, keep the cake at room temperature!
Here's the sweaty cake before I realized I shouldn't keep putting it in the fridge.
Oooh, shiny. And when that black fondant gets shiny, it gets messy and the color transfers everywhere. Black-tinted fondant really is a pain, in my opinion.
So this morning, I took the cake out of the fridge and let it sit on the counter for a couple hours. What a huge difference!
The gooey, slimy fondant dried out and became much more stable. Hooray! That means I could apply more disco dust (that's edible glitter!) to all the pink areas. Disco dust and slimy fondant don't get along.
I used a printout of a zebra pattern and a pastry cutter to make the zebra stripes and a circle cutter to make the peace signs. I also used the fondant to make a number 11 for the top. I stuck some toothpicks in them and left them out to dry overnight. There they are on the side.
And here's the final cake all put together.
And here's how the inside looked. Not exactly zebra striped, but close enough.
And tasty too!
Tuesday, May 29, 2012
Ahoy! It's a Boy!
Earlier this month, we traveled to Oregon to spend some time with family and celebrate at a good friend's baby shower. She asked me to make the cake for her, and of course I agreed!
The shower had a nautical theme, so we decided on a cake with some waves and banners, and a boat topper. I again made my own fondant using powdered sugar and marshmallow. I used bunnywoman's recipe from the Wilton forum web site and I borrowed a KitchenAid mixer from a friend in town.
I did find that if you simply double the small batch recipe, it gets very sticky. In the future I'll halve the large batch recipe like I've done in the past. It works much better. So the dark blue was a little stickier than I would have liked and I think if it weren't so sticky, the waves would have been a little more crisp. Alas, I think it still looked pretty good.
The cake itself was lemon poppyseed, with a raspberry buttercream filling and a lemon buttercream frosting on the outside. I stacked three 10 inch rounds with filling in between each. I used some of my mom's raspberry jam in the filling and it was delicious! I put a little bit of clear vanilla in the fondant just to make it taste better.

The shower had a nautical theme, so we decided on a cake with some waves and banners, and a boat topper. I again made my own fondant using powdered sugar and marshmallow. I used bunnywoman's recipe from the Wilton forum web site and I borrowed a KitchenAid mixer from a friend in town.
I did find that if you simply double the small batch recipe, it gets very sticky. In the future I'll halve the large batch recipe like I've done in the past. It works much better. So the dark blue was a little stickier than I would have liked and I think if it weren't so sticky, the waves would have been a little more crisp. Alas, I think it still looked pretty good.
The cake itself was lemon poppyseed, with a raspberry buttercream filling and a lemon buttercream frosting on the outside. I stacked three 10 inch rounds with filling in between each. I used some of my mom's raspberry jam in the filling and it was delicious! I put a little bit of clear vanilla in the fondant just to make it taste better.
The topper was made out of cardstock with white glitter stickers and attached to the cake using kabob skewers. The cake looked great, tasted even better and the shower was so much fun celebrating the baby boy coming in a few weeks!
Sunday, February 5, 2012
Mommy had a little lamb PART 2
You have to have the chocolate hot enough to have enough time to attach everything before it dries, but cool enough that everything doesn't slide right off. These took waaaayyyy longer than I expected, but I think they're adorable!
Also, I wasn't thrilled with the idea of the cake pops being super crunchy so I substituted Kraft Mallow Bits for the sugar pearls. I got them at Target for $1.50 each and it took 4 containers to do 50 pops, with a bit left over. Also, I used junior mints for the faces instead of licorice, just because I think black licorice is nasty (and the bridge mix in the recipe is expensive at Woodman's!) They're still a little crunchy but not as much as I expect the sugar pearls would have been.
I can't take credit for the super cute tins with the grass - one of the shower hostesses put those together, but they look adorable and were a great centerpiece!
Mommy had a little lamb
First, the cakes. I I put together two 3-layer 8-inch round cakes, one with pink fondant and one with blue. She has a lamb theme going, so I put some lambs on the tops and the sides.
I again used bunnywoman's trusty marshmallow fondant recipe from the Wilton forum site. I halved the large batch recipe (8oz of marshmallows and 3 1/2 cups of powdered sugar), which seemed to work well, although I would recommend still using 2 Tbsp. of water. This is another instance where I LOVE the dough hook on my Kitchenaid mixer - making fondant is such a pain without it and a breeze with it! I also recommend adding the coloring (I use Wilton gel in the small jars) to the melted marshmallow before adding the sugar - it saves a ton of kneading time.
And can I just say that when Wilton says their gel coloring is named pink, they really mean freaking bright electric super neon pink. I guess that more accurate description wouldn't fit on the jar. This lovely pastel pink color is called rose petal pink and was a much better choice. The blue is cornflower blue - both colors came in a boxed 4 pack, along with a peach and a sea green.
I've never piped words on to a cake before and I wasn't quite sure how to go about it. I was worried that if I freehanded it that the spacing would be off or I would run out of room.
So I made a template in Word and printed that off. (I used wordart to create a 6.75" circle of round text). I placed it over the top of the cake and used a toothpick to prick through the paper to create tiny holes underneath. I then used the marks on the cake as a guide to pipe the frosting over the top (using a Wilton #5 tip.)
For the boards, I took 3 round cake boards, used some packing tape to tape them together and then covered them in aluminum foil. I love how these cakes turn out and the beautiful mama-to-be seemed pleased as well!
Saturday, January 7, 2012
A Few Party Ideas...
A friend of mine recently asked for some help with a few decorations for a gathering she was having with some friends. I pulled together a few ideas and we decided to try a few things we found on Pinterest (where else?)
First, we bought18 wine glasses from the dollar store and dipped the bases in chalkboard paint. My friend already had the paint, so the total for this project was only $18!
This was a pretty simple project. I dumped some paint into an old Ziploc brand container and then dipped the glasses into the paint. (The dollar store glasses are the tiniest bit too big to dip straight into the paint quart.) The hardest part was figuring out how to let them air dry.
I used a quart of rustoleum chalkboard paint, but I think it would be easier to use chalkboard spray paint, simply because instead of dipping the bases in paint you just spray the bases and don't have to deal with all the drips. Anyway, I held them over the paint bowl until all the major drips ran off, then propped them up on a couple Ziploc brand containers and rotated them every few minutes until they were dry enough to stand upside down without dripping. I also wrapped painters tape around the base of each stem to stop any drips. This also helped keep the glasses from rolling off the containers. If I thought more about this step ahead of time, I probably would have tried slicing up an old foam pool noodle and placing each stem in a slit to dry.
Within an hour or so, they dried to a nice smooth chalkboard finish and will be a fun way for guests to mark their glasses. You could do this with anything and I am already thinking of other ways to use chalkboard paint - hot cocoa mugs perhaps?
Next, we took some inspiration from Martha Stewart and put together some labels for the buffet table. I simply cut out an oval shape, used a hole punch on each end, and fed a ribbon through. (I'd suggest writing on them before feeding the ribbon through, if you can.) These were simple to make and look elegant on a table. You could also use these as table place cards - I made 20 for less than $4.
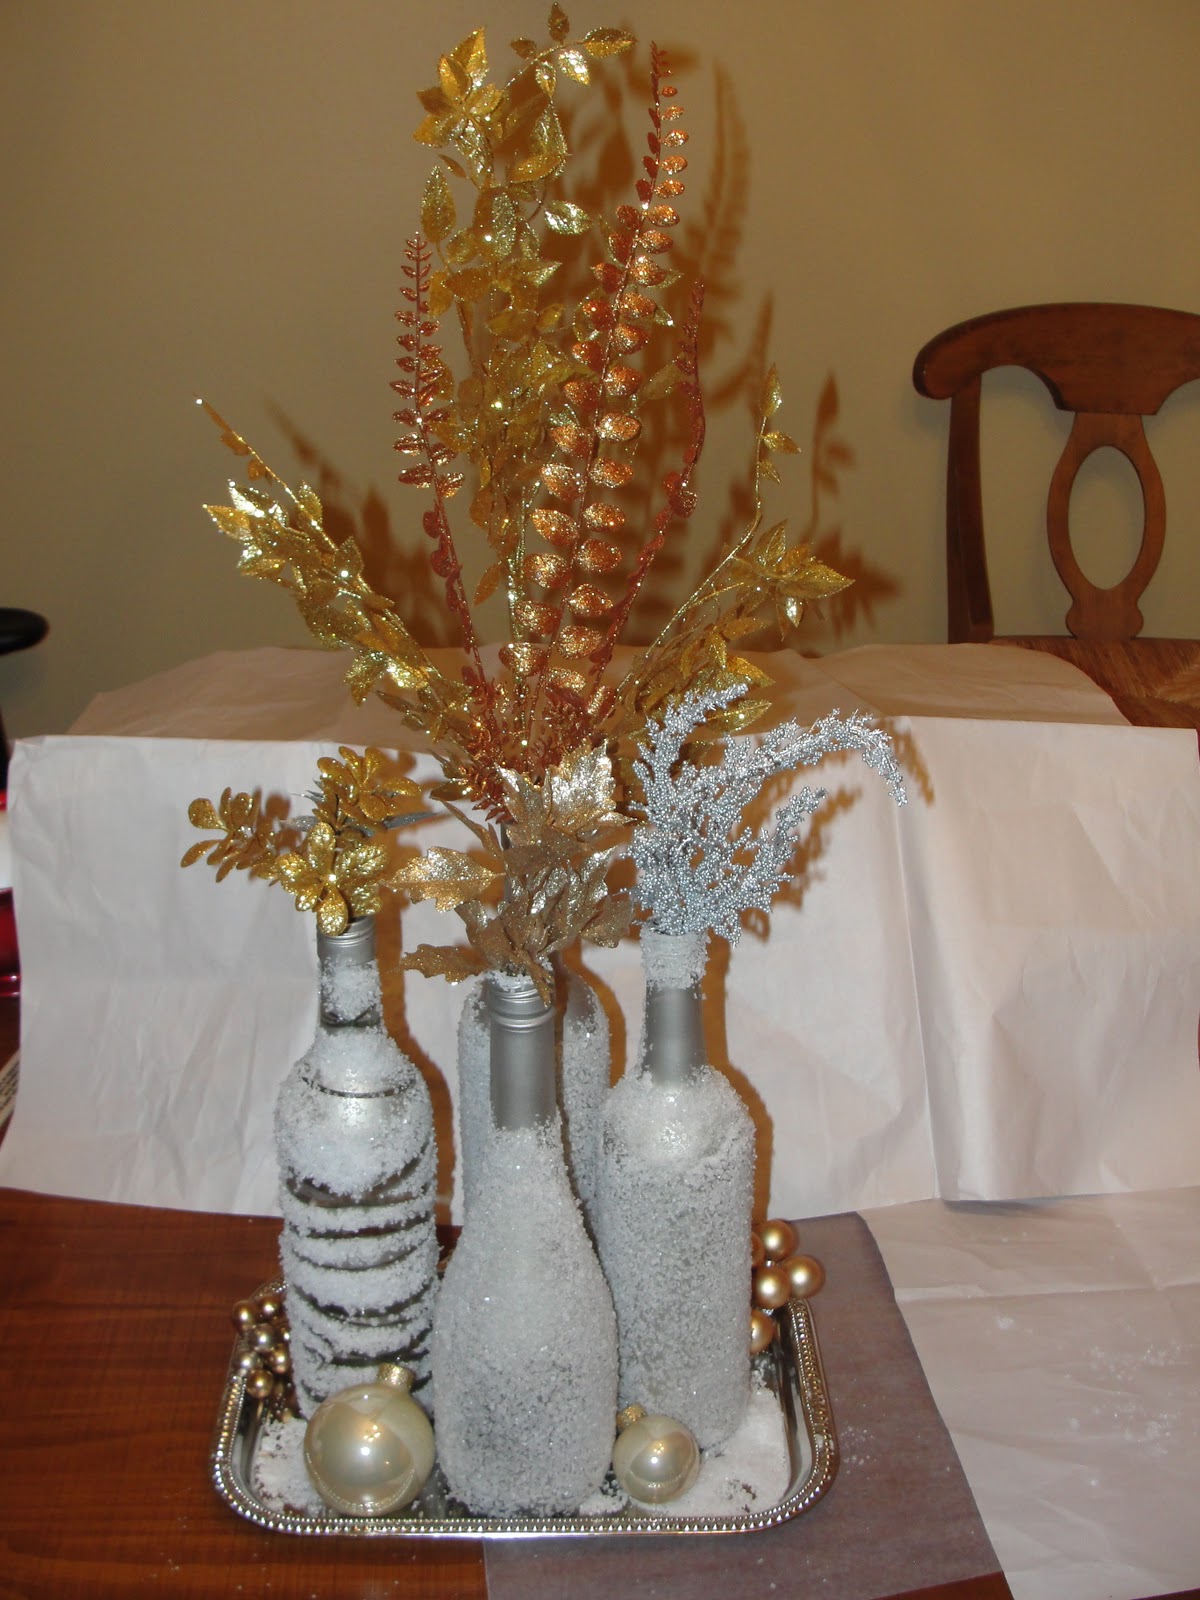
The final project was a bit more ambitious because I had never spray painted before and have always been intimidated by it. It was easy! We collected a few empty wine bottles (it helped that this was the week after New Year's!) I spray painted them a nickel color (Krylon has a line of metallic colors.) Then, after they dried, I used Elmer's craft spray adhesive to coat the outside and then rolled them in Epsom salt. The salt makes the bottles look like they were coated in snow. You can get the Epsom salt at any drugstore for a few bucks - I got this carton in the first aid section at Target. (The paint came from Hobby Lobby and the glue from Michael's.)
To give a little added dimension, I put some rubber bands on one of the bottles before painting. After rolling in the salt, I removed the bands to expose the clear glass. It's difficult to see here but it gave it a neat look with a stark contrast between the snowy white and the clear glass. It would be really cool to drop in a thin candle or an led light to twinkle through the glass.
I placed the bottles on a silver tray from the dollar store, then filled them with some metallic floral stems from the after-Christmas clearance at Michael's. I added some more salt to the tray to look like snow and then arranged some ornaments, metallic balls and tea lights around the base of the tray.
One note about the spray adhesive - when using it, be sure to pay attention to overspray. I placed paper around the bottles before spraying, but still managed to get glue all over my dining room table, my scissors and my hands. It definitely gets everywhere and leaves a sticky residue. Fortunately I had some Goo Gone on hand to clean everything up.
These were fun projects for me and I was able to try a few new things - like spray paint and chalkboard paint - that I had been looking to try.
This was a pretty simple project. I dumped some paint into an old Ziploc brand container and then dipped the glasses into the paint. (The dollar store glasses are the tiniest bit too big to dip straight into the paint quart.) The hardest part was figuring out how to let them air dry.
I used a quart of rustoleum chalkboard paint, but I think it would be easier to use chalkboard spray paint, simply because instead of dipping the bases in paint you just spray the bases and don't have to deal with all the drips. Anyway, I held them over the paint bowl until all the major drips ran off, then propped them up on a couple Ziploc brand containers and rotated them every few minutes until they were dry enough to stand upside down without dripping. I also wrapped painters tape around the base of each stem to stop any drips. This also helped keep the glasses from rolling off the containers. If I thought more about this step ahead of time, I probably would have tried slicing up an old foam pool noodle and placing each stem in a slit to dry.
Within an hour or so, they dried to a nice smooth chalkboard finish and will be a fun way for guests to mark their glasses. You could do this with anything and I am already thinking of other ways to use chalkboard paint - hot cocoa mugs perhaps?
Next, we took some inspiration from Martha Stewart and put together some labels for the buffet table. I simply cut out an oval shape, used a hole punch on each end, and fed a ribbon through. (I'd suggest writing on them before feeding the ribbon through, if you can.) These were simple to make and look elegant on a table. You could also use these as table place cards - I made 20 for less than $4.
The final project was a bit more ambitious because I had never spray painted before and have always been intimidated by it. It was easy! We collected a few empty wine bottles (it helped that this was the week after New Year's!) I spray painted them a nickel color (Krylon has a line of metallic colors.) Then, after they dried, I used Elmer's craft spray adhesive to coat the outside and then rolled them in Epsom salt. The salt makes the bottles look like they were coated in snow. You can get the Epsom salt at any drugstore for a few bucks - I got this carton in the first aid section at Target. (The paint came from Hobby Lobby and the glue from Michael's.)
To give a little added dimension, I put some rubber bands on one of the bottles before painting. After rolling in the salt, I removed the bands to expose the clear glass. It's difficult to see here but it gave it a neat look with a stark contrast between the snowy white and the clear glass. It would be really cool to drop in a thin candle or an led light to twinkle through the glass.
I placed the bottles on a silver tray from the dollar store, then filled them with some metallic floral stems from the after-Christmas clearance at Michael's. I added some more salt to the tray to look like snow and then arranged some ornaments, metallic balls and tea lights around the base of the tray.
One note about the spray adhesive - when using it, be sure to pay attention to overspray. I placed paper around the bottles before spraying, but still managed to get glue all over my dining room table, my scissors and my hands. It definitely gets everywhere and leaves a sticky residue. Fortunately I had some Goo Gone on hand to clean everything up.
These were fun projects for me and I was able to try a few new things - like spray paint and chalkboard paint - that I had been looking to try.
Subscribe to:
Posts (Atom)