Showing posts with label house. Show all posts

Monday, July 14, 2014

Drumroll Please...

After eight long years we have finally, finally, FINALLY painted the upstairs hallway. It is done! No more builder paint and scratchy flat walls scraping up my knuckles when I move laundry baskets. Can you hear the Hallelujah Chorus singing in the background? I would do cartwheels if I thought it wouldn't cause serious injury.

The color is Burnished Clay by Behr. It's a light gray with a hint of blue to it. It's the same color we used in the bonus room, and is a definite change over the gold and white combo we had going on before. (Half of the hallway was painted before. The other half was still white builder paint. Classy, I know.)

It took us forever to repaint because there are some high ceilings in the stairway and the best way to paint those high corners was not always obvious. But with some pole wielding and ladder maneuvering, we made it happen.


The thing about this space is there is no natural light. The only light that it gets is from the bedroom windows. If the bedroom doors are shut, the hallway is dark. So I picked the gold eight years ago thinking it would help keep things bright. And it certainly did cast a gold glow on everything. EVERYTHING.


Here it is midway through. You can see how the gold wall (left) casts a gold glow on the gray wall (right) so that you can't even tell it's not gold. Maybe I should consider a new kind of brighter white light bulb in there. But honestly, I have no idea how we'd get to it. Fourteen feet up in the middle of a stairwell. I fear the day that bulb burns out.


We've done the entire upstairs hallway, and the stairwell, and one small wall in the downstairs hallway. So we do have more of the downstairs hallway to do. This is more like a few hour job than a weekend job, though. Lots of cutting in and not a lot of wall space.

Now that the walls are a much cooler color, I'm looking forward to adding some more pops of color somehow. I'm thinking of doing some kind of timeline on the walls that has the history of our family... from our first date up to now. Maybe?

I do like the new color, and I'm debating just going for it in the family room too. (It is also gold/yellow.) We'll see. I'll probably just live with for a while, because we all know how efficient I am at getting these painting projects done!

Wednesday, March 5, 2014

This Garage is Awesome

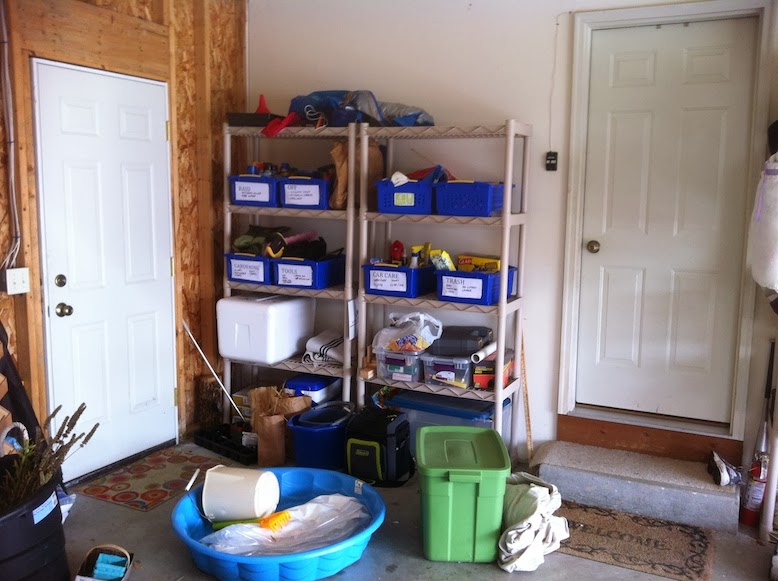
Hey remember when our garage looked like this?

 And then this?


And then it looked like this?


Well now it looks like this!


Our mudroom system is finished! And none too soon. We've been using this space a lot lately. Have I mentioned how freakishly cold and snowy it has been this year? Here's a recent view out that back door.  A couple steps further and E was in above her knees.


Anyway, it has been so nice to be able to dump off all the coats, hats, gloves, scarves and muddy boots BEFORE they enter the house. Yes, they do get a little cold out there, but with the new insulation in the garage, it hasn't been as bad as I had feared.

Up next on the Project Awesome Garage agenda: painting the interior garage doors and trim, adding drywall to the garage, adding some trim, baseboard and caulking in a few areas, putting down an outdoor rug to cover the laminate floor, and sewing a custom bench cushion. And possibly a few other cute little touches here are there - maybe some big art or a mural or quote above the top shelf? But the bulk of the work is done and it is so nice to have a space that we can use!

Let's take another moment to enjoy the transformation, shall we?


Saturday, August 24, 2013

Staying Dry

Remember back in March how I mentioned that our basement always seems to be wet? And that I was sick of it?  Things were getting so bad around here, that we had the wet vac on standby in the basement every time it rained, just in case.

Well, in June, our basement took on some water yet again. And again it was a silly, pointless sump pump failer. Another late night workout with the vac. Hey, at least it's good cardio.

Well, this time we decided we weren't going to mess around. We walked past the pallet of the cheap-o sump pumps at Lowe's, and headed straight for the mother of all sump pumps. Ladies, and gentlemen, I give you the extremely expensive, yet extremely effective Basement Watchdog. Because you can't put a price tag on keeping the junk in your basement dry.


Backup pump, backup battery - this thing has it all. And after a couple of serious rain storms, including the return of the lake in the back of the yard and some nice little marble sized hail, the basement is still dry.


Hooray! I remain optimistic that this will fix things. Although I did buy a couple of water sensors for the basement floor. Just in case.


Thursday, July 4, 2013

Happy Fourth!

Happy Fourth of July! We're celebrating here by going bed early. Exciting, I know. But we had an early morning and we have a couple other parties coming up this long holiday weekend.

Check out the fun wreath I made for the front door. Cost about $13 in supplies with enough to make another. I used a straw wreath (keep the plastic wrap on!), some yarn, scotch tape and pre-cut wood stars that E painted white for me. Easy, but a little time consuming to wrap the yarn. The idea came from a few of the flag wreaths and tutorials floating around Pinterest.

Hope you have a fun and festive Independence Day!

Tuesday, June 25, 2013

Cutie Pie Kiddos... and Designing with Clutter in Mind


Remember those photos I mounted last weekend? I got around to putting them up a couple days ago. Honestly they would have sat around a lot longer, but I was worried that some little fingers would mess them up. Nothing like your own sticky kids to motivate you to get things done!

So here they are. Aren't they beautiful? I love how they turned out. You know what else I love? Having the talented photographer Holly Isaacson as my sister-in-law. Seriously I wonder how she accomplishes all that she does, and still has time to take such beautiful photos and run an awesome art blog and still raise three fantastic kids. 

When I put up the frames up above Jonas' changing table in his nursery, I used the toothpaste method I found on Pinterest. A complete and total disaster. Not only did I get toothpaste everywhere (except where it needed to be), but it took me hours to get those photos just right.

This time around, I simply put up paper that matched the frame size (12x12 scrapbook paper) and arranged it how I liked it. Stuck a few nails through the paper that matched the hangars on the frame and we were done. It still took a bit of time with a ruler but overall SO MUCH EASIER.


Now here's the thing about design that really gets to me. When you see all those pretty photos on blogs and in magazines, the rooms are clearly staged. Stylists come in and arrange things just so and then nobody breathes or moves until the picture is perfect. The truth is no one lives like that. There is no way that anyone (at least anyone with kids) has a room that is that clean and that perfect for more than five minutes. And all those crystal or ceramic vases and bowls that are placed all around? Those wouldn't survive a day around here. As much as I hate it, clutter is a way of life. It just piles up.

So as I stared at the paper on the wall, I thought to myself that the photos should be lower. They look too high up and unevenly placed for the space. But then I remembered (actually, I tripped on) all the clutter I had moved to the floor.


If I don't live my life picture perfect like a magazine, why should I place the photos that way? So I decided to hang them with future clutter in mind. That way, when the clutter piles up like it inevitably will, the photos won't be hidden and won't serve as another reminder about how chaotic my life has become. None of us need one more thing staring us down and telling us we don't have our act together. The kids do that for me all on their own. Ha!


So higher up they went, and then the clutter got added back in. (I will confess that I did put some of it away.) Maybe I'm desensitized, but now I kind of like the clutter and how it looks all together. And in reality it's the way I live. It's why I have an office chair around my dining room table, why my coffee table is completely out of reach of the couch and why the vacuum doesn't have a permanent home and yet never gets used. Because it works for us.


That's why I love these photos so much. They remind me of what's important in life. So here's to you, cutie pie kiddos. I love you lots and I hope I always remember that you are everything I hoped for and more. 


Sunday, June 23, 2013

Windows, Windows, Windows

Last weekend I finished and Tom hung up the new valances in the bonus room. When we moved in seven years ago, there were some craaaazy window treatments that came with the house. At the time, I was thrilled just to have something covering all the windows, but I was soon completely unimpressed with the orange corduroy roman shades and heavy gold drapes.  

I updated the downstairs treatments fairly quickly, but it has taken a while to get to the rest of the house. Lately it seems like we've been going crazy for windows. The new bonus room valances are made from the fabric I got on mega clearance at JoAnn's last year year and the inside of the side pleats are leftover scraps from the headboard project. All done for less than $20. Score!

 
I made a similar valance for the kitchen with some fun fabric from Hawthorne Threads. It has a cute baking theme and the aqua stripe along the bottom matches my KitchenAid. The inside of the pleat is a sunny yellow polka dot. It's the kind of pattern that makes me smile when I look at it. I may make something similar for the sliding glass door.


And finally, I've been helping my awesome friend Janet with some window treatments for her house, including new valances for her family room and also a valance for her son's room. For these we used the simple method of stapling the fabric to boards and using hem tape on the bottom. They mount to the wall with simple L brackets. Only minimal sewing - and that was just to seam two pieces together to span her large window.


Lots of impact for not a lot of money. My kind of project!

Tuesday, March 19, 2013

Milestone Monday!

We've hit a milestone here - this little ol' blog of mine has hit 10,000 page views. Exciting! So thanks to all of you for reading my ramblings and sticking with me through infrequent posts, crazy projects and my sub-par photography. (And I realize it is not Monday as the title suggests, but Milestone Tuesday doesn't sound as great, now does it? And I did think of it yesterday.)

Honestly I've been feeling a bit overwhelmed lately with all the projects that are unfinished around here - the mud room in the garage, the bonus room window treatments, the unpainted upstairs hallway, etc. And did I mention that the basement flooded again? That's the third time in seven years. Ugh. Fortunately we learned our lesson the first time and everything was off the floor or in a waterproof bin. And we caught it before there was too much of a mess.


Lately I've kicked it into high gear and am finally powering through some things that should have been done ages ago. Our bedroom is now painted and has curtains again, and yesterday I finished sewing the kitchen window valance. I'll post pictures once the house is not a complete disaster. Oh yeah, and the valance still needs to be hung up. Lucky you, tomorrow is cleaning day and my handyman (i.e. Bubba) is coming over tonight.


Because I have many projects going on at the same time, one of the ways that I keep everything organized is my house binder.  I like to have all the info about every room handy when I'm out shopping for stuff, because you never know when you'll wonder whether the fabric in the quilt is raspberry pink, bubblegum pink, or pinky pink.

I bought a small 7x9 inch binder from Office Max and some business card inserts and filled it full of paint swatches and fabric samples. Each room has its own page, so it's easy to find what I'm looking for when I need it. I love having everything all in one place!


Wednesday, March 13, 2013

Master Bedroom Painting

It seems like I always have multiple projects going on at once. I have a tendency to start projects and then let them hang on forever, either because of indecision, inability or lack of time. One of my New Year's resolutions was to finally finish painting all the rooms in our house. We've been here for about seven years now and there is still rough, scratchy marked up builder paint in spaces.

In the fall, when we stained the deck, I also got a few estimates for painting our master bedroom. The numbers were a bit higher than I wanted, so I figured I could do it myself. How hard could it be to paint the walls and ceiling of a huge bedroom with 11 foot vaulted ceilings and a ceiling fan smack dab in the middle? Well, I can tell you it was HARD work. Imagine me standing on tiptoes on top of a ladder, maneuvering between fan blades, using a small brush to paint a very large space.  It took a solid weekend and there were times I wasn't sure I was going to be able to pull it off. But now it is done, nobody got hurt, I got a great workout and I love the color (Jogging Path by Sherwin-Williams).

Took me forever to get that tape around the light fixture!

Just starting out - this part took the most time!

The room already feels much cozier and homier. Now comes the fun part - new curtain rods, window treatments, lamps, pillows, etc. And here's a small confession. I'm not that great at pulling together all the coordinates. In fact, Ben is much better at it than I am. He can look at something and decide instantly and accurately whether it will look great or awful in the space. If only he shared my belief that you can never have too many pillows.
Half done with the ceiling!

Finally finished with the paint! Now on to accessories!
I've been loving the new Threshold line from Target. The other day I went on a buying binge (it's all on sale this week) and snatched up a bunch of lampshades, curtain panels and lamps. Now comes the part where I stare at them forever before deciding whether Ben is right (he usually is) about what should stay and what should go. The other option is using some of the newvstuff in the bonus room, which also has new paint but no accessories. I hope to have pictures of both completed rooms soon. I have lots of great ideas for the walls, thanks to Pinterest, so we'll see where we end up.

Thursday, December 20, 2012

Jonas' Nursery

We are now the proud parents of Jonas, a beautiful baby boy. During this pregnancy, I nested like CRAZY. Most of the madness centered on creating the perfect nursery for our sweet baby boy. Here's a few pictures of the (almost) finished room!


I chose Alexander Henry's 2d Zoo fabric for the main print in the room. It's the animal print in the crib skirt and the blanket (both came from myfrecklesshop on Etsy.) The crib sheet and changing pad are from Target and are a great match to the zoo print.


The talented Mary Johnson put together these awesome canvases for above the crib.


I put together these prints using Microsoft Word (and some scrapbook paper for the whale.)


The fabric bins also use the 2d Zoo print and are the perfect size for holding diapers and wipes.


And they fit in the cubeicals from Target!


 I'm still working on the art above the changing table, but the prints are also a Microsoft Word creation, printed at Office Max with some scrapbook paper animals that match the zoo print fabric. Eventually there will be something above the mirror as well. I'm thinking it may involve the chevron print from the letters above the crib.


I do plan to post some more about the individual projects in the room, but we all know how I am about getting things done in a timely manner! So look for them in the not too distant but still somewhat far away future. If there's anything you'd like to know more about, leave me a note in the comments.

Sunday, November 11, 2012

Window Valances for the Guest Room

Wow, how time flies. I can't believe that it's already the middle of November. AND that we're having a baby this week. Did I mention that already? Well it has been project city around here lately, but I'm not quite ready to share all those with you yet. But when I do, I promise there are LOTS of fun things going on. Mostly projects for the boy's nursery and E's big girl room. Exciting stuff!

But until then, check out this awesome home decor fabric I found in the red tag section at Jo'Ann's for $4 a yard. I got enough to do new valances for the bonus room windows for $8 and probably have enough left over for a pillow or two. Score!


I had been looking for some fabric that would go well with both the new dresser and the new headboard. I had found some Waverly fabric that I really liked for about $20 a yard, but the swatch wasn't quite right. The white wasn't white enough to go with the stark white in the headboard. This new fabric is a little more angular than I was looking for, but after putting it all together, I think it will still work great. I found a DIY tutorial on Pinterest (where else?) so hopefully we'll have them done sometime early next year.

I want to add in another color in the room too. I'm thinking about coral, after being inspired by this posting by Centsational Girl. We'll see how that goes. I've been perusing a lot of fabrics over on the Hawthorne Threads site. It's a great site to waste time and get ideas. Or maybe I'll get lucky and score another great deal in the red tag section. Fingers crossed!

Thursday, September 6, 2012

September Already?

I saw a school bus go down the street yesterday. How did that happen? Seems like the summers go by so fast around here.

There's been a lot going on around here. At the beginning of the summer, I put together a quite ambitious project list, and I'm happy to say that (with a LOT of help) we've knocked out most of it.
I've also decided that when I say that I can do something, it's ok for that to mean that I can ask or pay someone else to do it! Because at the end of the day, sometimes it just needs to get DONE!

Here are a few of the projects...

New Deck Lattice
My brother is a talented deck builder in Portland, Oregon, and when we bought our house a few years ago, he flew out to Wisconsin and built us a gorgeous deck. Fast forward a few years, and we now have both a toddler and a family of wild bunnies in the neighborhood who are very curious about what goes on under the deck. So we put up some lattice around the bottom to hopefully keep curious critters at bay. Not that I actually did any of the work. My father-in-law did it all. I supervised :)


And the finish on the deck will be restored to its former glory before the end of the summer. It is in desperate need of re-staining, but the deposit check has been mailed!

New Painted Dresser
A while back it seemed like we needed furniture in every room. Dressers, kids furniture, etc. Then we scored some deals on Craigslist and at the Elkhorn flea market. Now it seems like we have more furniture than we know what to do with and we're constantly moving it around from room to room.

As part of the Great Furniture Shuffle of 2012, I found this great antique dresser at the flea market. I loved the look of it, it was in decent shape, the drawers slid pretty well, and it was only $60! for the dresser and mirror.


I thought about trying to fix this one up myself, but alas, I am pregnant and tired. So I wisely decided to have Jorie at 63rd Avenue do it for me. (She's also the one who painted our awesome dining room furniture!) She used Annie Sloan Chalk Paint in Aubusson Blue and then hand painted the white based on a design I gave her. Then the whole thing has a coat of clear wax to seal it.


And here's how it turned out! I love it! The mirror is also blue now too, we just haven't gotten around to putting it back up yet. Although I may wall mount it instead of mounting it to the back of the dresser. We'll see.

Martha's Fabulous Pumpkin Cookies
The other day I found some pumpkin in the freezer from last fall that I needed to use up, so I made these cookies off the Martha Stewart web site. They are amazing. Drop everything and go make them now. Seriously, do it. You will not be disappointed.


I'm working on putting together a new project list for the fall - can you tell I'm nesting? So far, there's the boy's room to work on, some window treatments for the guest room and the kitchen, and a makeshift mud room for the garage. Oh yeah, and I'm sure rearranging more furniture. Why not? If it all gets done this fall, I will be so thrilled! Coming up next on the blogosphere, a preview of the boy's room so far, a quick and easy (and low sugar!) freezer jam recipe from Mom, and maybe a few simple projects I've been doing with E. Stay tuned!