Tuesday, June 12, 2012

Dining Room Rehab: Fabric-Backed Cabinet Tutorial

I'm very excited to share with you one of my favorite parts of our dining room rehab - covering up the mirrors behind the china cabinets.

I've noticed that the more you stare at something, the more you get used to how it looks in a space. You almost stop seeing it and you lose sight of what it could be. So at first, I thought about leaving the cabinets mirrors as is. I thought if we updated the glass doors and all the hardware, maybe that would be enough. I'm all about starting small and taking things one small project at a time.

But after many more nights of sitting and staring at those 1980s mirrors, I decided it was a cheap and easy update and if I didn't like it, it was easy to remove. So I went for it and I love how it turned out.

Here's how I did it:


Materials:
Foam core board (enough to cover the entire area in one piece. Available at craft stores. If they don't have it large enough on the shelf, ask in the frame department. They carry larger pieces for about $10 each)
Fabric (enough to cover the area with no seams and enough to cover the foam core with at least four inches of overlap on each side. My fabric was 54 inches wide so I only needed two yards.)
Spray adhesive
Glue dots or Zots

Tools:
Rotary cutter
Cutting mat
Yardstick and measuring tape

Cost: About $40 - $20 for foam core, $12 for fabric, $8 for adhesives

Time: 2-3 hours

Step 1: Take precise measurements of the back of your cabinet. Mark out these measurements on the foam core. I made marks on a yardstick to help ensure an accurate transfer to the foam core.

Note: I was fortunate that my shelves were removable, meaning I could use one continuous piece for the entire cabinet. If your shelves are fixed or attached to the back wall, you may need to do multiple pieces.

Step 2: Use the rotary cutter to cut the foam core board down to size. I used a yardstick to ensure a straight cut. Be sure to place the cutting mat underneath the board to prevent scratching the surface underneath.


Once the board is cut, it may help to place it in the cabinet to ensure a snug fit. Remember that it's always easier to cut smaller if needed than to wish you had more!


Step 3: Lay out the fabric face down on a large, flat work surface. Place the foam core on the fabric, taking into account any nap, grain or pattern in the fabric.


Step 4: Working one edge at a time, spray the edge of the foam core with spray adhesive and fold the fabric over on to the foam core, being sure to keep the fabric straight and tight.


Step 5: Fold the corners over like if you were wrapping a package. Use a glue dot to secure the corners.


Step 6: Continue working your way around until all the excess fabric is wrapped around the back of the foam core and glued in place. Use glue dots as needed to ensure the fabric is securely attached to the back of the board.


Note: I thought about using spray adhesive on the front of the board to secure the fabric in place. The fabric that I bought, however, was very thin, and the glue soaked through and left a mark. So, if you want to go this route, be sure to test an area first to ensure it won't stain.


Step 7: Once the glue has dried, place the board in the cabinet. If your measurements were close enough, it should fit snugly without any adhesive. If things are a little loose, you could use a removable glue dot in each corner to secure things in place. Once you put the shelves in, that may also help hold things in place.


Step 8: Stand back and enjoy your work!


The neat thing about this project is you can easily swap out the fabric depending on the season, your decor or your mood. Unlike paint or wallpaper, there is very little commitment. Just pull the foam core out and re-wrap with whatever fabric you'd like.

Here's how it looked before we painted...


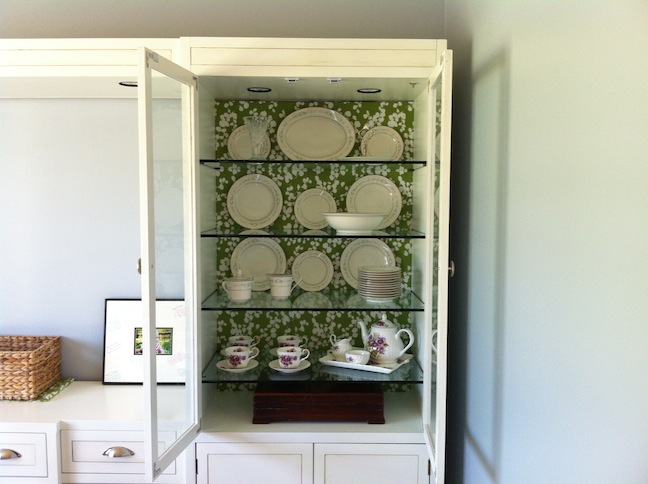
And here it is now, with gleaming china in place. Love it!


Saturday, June 9, 2012

N is for Naomi!

Have I mentioned that it is baby central around here lately? There are people having babies all over the place. You just never know who is going to be next :)

So, another friend of mine had an adorable baby girl recently, and I had the privilege of adding a little something to her beautiful baby room. The room colors are lavender and red - so pretty!

I put together another yarn-wrapped letter for baby Naomi and added some felt flowers and buttons. And while it took me WAAAYYYY longer than it should have, I'm happy to show you how it turned out!


Dining Room Rehab: Updating the Glass Doors

As part of our dining room re-do, we wanted to update the glass doors on the furniture we bought on Craigslist. As a reminder - here's what they looked like when we started. Not the worst in the world, but definitely not the best either!


We looked at two options - either gluing wood pieces of molding to the existing glass, or creating an entirely new set of doors with new glass. We ultimately decided on the second option - putting wood frames around new pieces of glass. The first option probably would have been easier and less expensive, but we thought the results would have looked a little more DIY. So, we went with the harder, more expensive option and I'm really glad we did! I love how the new doors turned out.


We started with about a half dozen 1x2 inch x 6 feet oak boards. (TIP: at the hardware store, go through all the boards to get the straightest ones - there were some very warped boards there!) We cut the boards to size, making a 45 degree cut on each end. (And by "we", I really mean my dad, who was gracious enough to do all this work during his vacation while I watched and pretended to be helpful.)


We used my father-in-law's table saw to cut a groove down each board, wide enough to snugly accommodate the width of the new pieces of glass. There was quite a bit of math going on at this point, as we took into account the width of the boards, the size of the glass, and the depth of the groove to make sure it would fit into the space correctly.

We visited a local glass shop and had them cut four new pieces of glass for us. They were also the ones who were able to tell us that the existing glass was tempered and couldn't be re-purposed. I didn't know this, but apparently once glass has been tempered, it cannot be easily re-cut.

Once we had all the wood pieces cut and grooved, we applied a small line of silicone down the groove and slid the glass in place. We also put some wood glue in the corners and set everything with some corner clamps to make sure it was all square. After the glue had dried a bit, we hammered in some finishing nails in the corners and added L brackets for extra stability.

We picked up some new hinges and hung them in place and added some new knobs. All told, the project cost about $120 for the wood the glass and various supplies. But what a difference!


Now at this point, I still wasn't sure whether we were going to paint everything white or just stain the doors to match the wood finish. (I don't know what I was thinking!) So, if I had the foresight - or the decisiveness - we would have painted these boards before assembling the frames. It would have been easier in the long run. But we didn't. So they were painted after the fact.  How fascinating.


At that stage in the game, I was already in love. Four beautiful new doors completely updated for this century. But here's how they look now, with new paint, new knobs, new backing and lots of sparkling china.  I am in LOVE!