Thursday, February 14, 2013

Happy Valentine's Day!


It wouldn't be Valentine's Day without something yummy to eat. We have a weakness around here for the salty/sweet combo. This year, E and I whipped up some dipped pretzels. (Yet another idea from Pinterest.) We used some vanilla-flavored red candy wafers (about $3 a bag from Michael's or Hobby Lobby) and some Valentine's Day sprinkles for a fun and festive treat.

You just melt the candy wafers in the microwave, dip the pretzels in the candy and then dip again in a bowl of sprinkles. (I added a teaspoon or so of vegetable oil to the candy wafers after melting to get the consistency I was looking for, and I think it helps them not harden so quickly.)

Set them on some waxed paper for about a half hour for the candy coating to harden. Yum, yum! Super easy and a fun project even the 2-year-old can help with.

Thursday, January 17, 2013

Fabric Bins for the Nursery

I am a huge fan of open storage. I like to be able to throw something in a bin easily and not worry about taking off or putting on a lid. (I'm lazy, I know.)

Both kids have the ClosetMaid Cubeicals in their closets to store books and other things. There are lots of storage options for these, but I've never liked how their fabric bins take up the entire square. It makes it difficult to just chuck something in, or to see what is in the bin from far away. I am both a slob and obsessive about organization, so I need something that can be organized chaos.


I found this great tutorial for fabric baskets and thought I could adjust the measurements to fit the Cubeicals. It was important to me that it was wide enough to fit a tub of wipes and a stack of diapers, and short enough to leave some room when put in the Cubeical. I also wanted something that could serve as a diaper storage bin for the top of the changing table when needed, but be able to be put away in the Cubeical when not in use.


Here are the measurements I used (replacing what is in the tutorial link above) -

Exterior Fabric - 2 pieces 11"x10", 1 piece 12"x29"
Interior Fabric - 2 pieces 11"x6.5", 2 pieces 12"x6.5", 1 piece 13"x14"
Interfacing - 2 pieces 11"x10", i piece 12"x29"

I used a combination of sew-in and iron-on interfacing, mainly because I didn't know what I was doing when I went to the fabric store. Having used both - the iron-on is a lot easier, but more expensive. The sew-in isn't hard, but takes a little more effort. Just make sure you baste it in so it's easier to take out if you screw it up. (This is experience talking here.)

I used some foam core I had lying around for the bottom piece, and some old ribbon for the handles. If I were doing it again, I would probably use something a little sturdier so they would stand up better.

I was only going to make one, but they were so easy I ended up making three. With basic sewing skills, I'd say this takes 3-4 hours each. I did the second and third simultaneously, which helped speed things up a bit.


 Want to customize this for yourself? Here's the formula I used to determine what size fabric I needed to cut.

For the exterior fabric:
2 of these: (Finished Width +1 inch) X (Finished Height + 3 inches)  (for the front and back)
1 of these: (Finished Depth + 1 inch) X (2xFinished Height + Finished Width + 5inches) (for the bottom and sides)

For the interior:
2 of these: (Finished Width + 1 inch) X (Finished Height - 1/2 inch) (for the front and back)
2 of these: (Finished Depth + 1 inch) X (Finished Height - 1/2 inch) (for the sides)
1 of these: (Finished Width + 3 inches) X (Finished Depth + 3 inches) (for the bottom)

Interfacing: Same formula as the exterior. 


Wednesday, January 16, 2013

The Perfect Quilt... and Mitered Blanket Binding for Dummies

I don't know about you, but I am thrilled it is January. We had a whirlwind November and December and we are all craving normalcy around here. Maybe because I haven't slept for more than a four hour stretch for the past two months? Just a thought.

But anyway, Mom and I have been working on a quilt for my daughter's room, and this past weekend, we finished it! I love love love how it turned out, and E does too. It is just perfect for her room. Ever since we put together her awesome baby girl nursery, I've been hoarding scraps of the fabric (from Michael Miller's Whimsy collection) to use on her big girl bed. Now the bed matches all the other pieces from her nursery - the window valance, rocking chair pad, doll cradle blanket and pillow and an additional throw pillow.

I only had a half a yard or so of about eight different prints, so we chose a chevron pattern so we could use all the different fabrics. Mom found a great white on white print to use as the base and used this triangle method to create the chevron. I should mention that Mom did 90% of the work here, maybe more. These projects always start with me saying something like, "I'm thinking of doing this... it looks easy enough" and end with Mom staying up until 3 a.m. hand stitching a blanket binding. So kudos to Mom for her sewing skills and willingness to participate in my crazy ideas.

Speaking of the blanket binding, one of the things that stumped us was how to do mitered corners that didn't leave seams somewhere. We watched and read quite a few tutorials online, and quite honestly, they were more confusing than helpful. But after much trial and error, we figured out our own way to do it. And since we both agreed that I'll probably call Mom with a crazy idea for another quilt in a couple years, we had better write this down. 

So here goes...

First, determine how wide you want your binding to be (we went with 2 inches) and quadruple it. Cut four strips, equal to the length of each side, plus a half inch or so on each end. Our strips were 8 inches wide.  First, fold over the ends about a half inch to hide the raw edge. Fold in half and press in a seam. Then fold the edges into the middle and press again. It should look like this.


The nice thing about our method is that you're not actually mitering corners. Instead, you're sewing down two edges, and then sewing on two more edges that have diagonal ends. So for two of the (opposite) sides, you stitch on the binding like you are putting on bias tape. Just make sure your edges are folding in so you don't have any raw edges.


Now, for the mitered sides. Take another strip and fold it like pictured here.


Place it on your quilt like this.


The right side is the raw edge of the quilt. Machine stitch the entire length of the binding in place from where you see the black pins (the fold on the far right).  Then turn the rest of the binding over on itself. You can see here how it creates your first miter. Hand stitch the diagonal in place. Mom says to use an invisible stitch.


Now flip the entire blanket over, and fold the remaining loose binding down on the other side. This will create the miter on the back side. Hand stitch the corner and entire length of the binding. (You could probably use the machine if you don't mind a visible seam on both sides, but again, mom and I are perfectionists.)


Repeat this three more times and you have a perfectly mitered blanket binding. Ta da!

Thursday, December 20, 2012

Jonas' Nursery

We are now the proud parents of Jonas, a beautiful baby boy. During this pregnancy, I nested like CRAZY. Most of the madness centered on creating the perfect nursery for our sweet baby boy. Here's a few pictures of the (almost) finished room!


I chose Alexander Henry's 2d Zoo fabric for the main print in the room. It's the animal print in the crib skirt and the blanket (both came from myfrecklesshop on Etsy.) The crib sheet and changing pad are from Target and are a great match to the zoo print.


The talented Mary Johnson put together these awesome canvases for above the crib.


I put together these prints using Microsoft Word (and some scrapbook paper for the whale.)


The fabric bins also use the 2d Zoo print and are the perfect size for holding diapers and wipes.


And they fit in the cubeicals from Target!


 I'm still working on the art above the changing table, but the prints are also a Microsoft Word creation, printed at Office Max with some scrapbook paper animals that match the zoo print fabric. Eventually there will be something above the mirror as well. I'm thinking it may involve the chevron print from the letters above the crib.


I do plan to post some more about the individual projects in the room, but we all know how I am about getting things done in a timely manner! So look for them in the not too distant but still somewhat far away future. If there's anything you'd like to know more about, leave me a note in the comments.

Monday, December 10, 2012

Cupcakes for my Cutie

My baby girl turned two last week. Since we also have a three-week-old boy at home, we wanted to give her a fun celebration but still keep things low key and easy to manage.

We decided on a cupcake theme, where the guests did their own decorating. That way I just had to whip up some cupcakes (from a box!) and some buttercream (using the awesomely delicious and easy Wilton recipe), throw some sprinkles on the table and call it good!

For the buttercream, I made the basic Wilton buttercream recipe, chocolate buttercream,  raspberry buttercream (using my own freezer jam - so good!) and a peppermint buttercream using the basic Wilton recipe plus about 1/2 tsp peppermint extract. This sounds more elaborate than it was - it only took about an hour using my KitchenAid mixer. How did I ever live without it?


I also made a few sugar cookies using my cupcake cookie cutter. I had been wanting to try decorating with royal icing for a while, and while I was too tired to give it my full attention, I think they turned out okay. I read a few tutorials online, and they all said that the consistency of the icing is key to flooding the cookie properly. I think they're right, and I was too impatient to figure it out, so I ended up just smearing the icing around on most of them. Fortunately the icing dried to a nice smooth finish. I'm sure I'll try again when I'm back to sleeping through the night because there's the potential for some really fun designs.


After last year's b-day extravaganza, I saved a lot of the decorations. This year, they all came back out of the basement, making it look like I spent way more time preparing than I actually did. We reused the tablecloths, runners, centerpieces and candy dishes. Score!


Sunday, November 11, 2012

Window Valances for the Guest Room

Wow, how time flies. I can't believe that it's already the middle of November. AND that we're having a baby this week. Did I mention that already? Well it has been project city around here lately, but I'm not quite ready to share all those with you yet. But when I do, I promise there are LOTS of fun things going on. Mostly projects for the boy's nursery and E's big girl room. Exciting stuff!

But until then, check out this awesome home decor fabric I found in the red tag section at Jo'Ann's for $4 a yard. I got enough to do new valances for the bonus room windows for $8 and probably have enough left over for a pillow or two. Score!


I had been looking for some fabric that would go well with both the new dresser and the new headboard. I had found some Waverly fabric that I really liked for about $20 a yard, but the swatch wasn't quite right. The white wasn't white enough to go with the stark white in the headboard. This new fabric is a little more angular than I was looking for, but after putting it all together, I think it will still work great. I found a DIY tutorial on Pinterest (where else?) so hopefully we'll have them done sometime early next year.

I want to add in another color in the room too. I'm thinking about coral, after being inspired by this posting by Centsational Girl. We'll see how that goes. I've been perusing a lot of fabrics over on the Hawthorne Threads site. It's a great site to waste time and get ideas. Or maybe I'll get lucky and score another great deal in the red tag section. Fingers crossed!

Monday, October 22, 2012

Steaming a Pumpkin

Fall is officially here, and while I'm crazily nesting as we await the impending birth of The Boy, I thought I'd give you a quick overview of how I stock the freezer with pumpkin every fall. Like many other foods of my childhood, pumpkin never came from a can. Because if you can get it fresh, you should buy it fresh.

We took the little Bugaboo on her first pumpkin patch excursion this year. She picked out two "baby pumpkins" and we steamed them at home to use for our Thanksgiving and Christmas pies, breads, muffins and other goodies.

Here's the simple how-to overview for steaming a pumpkin: Cut it up. Get rid of the guts. Throw it in the steamer. Remove the skin. Mash it up. Use it in your recipe in place of canned pumpkin.

For those that like a little more guidance - here's some more thorough instructions.

Step One: Put that canned pumpkin back on the shelf and head to the produce section or the pumpkin farm, where real pumpkin can be found. Pick out one of those little pumpkins, sometimes called pie pumpkins. I have no idea what makes one pumpkin better than the other but I usually go for smooth skin and good orange color. One small pumpkin should give you about two cups or more of pumpkin.


Step Two: Cut off and discard the stem and cut the pumpkin in half. Keep the skin on. Cut the pumpkin up like you would an apple or a melon and scoop out all the nasty guts and seeds in the middle. Try to scoop or slice enough out so that you don't have a lot of strings behind.

Step Three: Put the pieces in your electric steamer. I learned early on that this is way easier than using the pot and steamer basket method. (And cheaper too if you kept burning up pans like I did!)


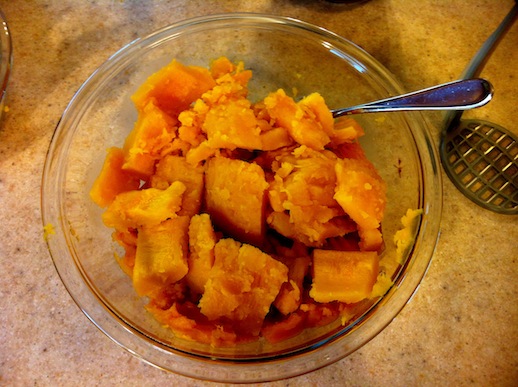
Step Four: Add water to the steamer, turn it on and let it do all the work. Mine takes about 30 minutes for two small pumpkins. You know your pumpkin is done when the flesh will easily separate from the skin. Stick your fork in and twist a little. It should easily come off of the skin (like in the picture above) and mash up easily. If you find it is still a little tough or crunchy, just give it a couple more minutes to steam. This will also help with the next step if you're (like me) too lazy to get out the blender.

Step 5: Use a fork to slide the pumpkin away from the skin. Throw the skins away. See how easily it separates when it's thoroughly cooked? Use a potato masher or a fork (or a blender for best results) to mash it all up.


Step 6: I like to measure out how much I need for each recipe before I freeze it. Mom's pie recipe calls for 1 1/2 cups of pumpkin, so that's what I put in each Ziploc container. Then I just stick it in the freezer until I need it. 


It tastes so much fresher than the canned stuff and is not that difficult to whip out ahead of time. Then when you need it, it's just as easy to pull it out of the freezer as it is to find your can opener. Tastier too!