Tuesday, February 4, 2014

Reusin' Stuff


Have I mentioned how much I love reusing stuff? Remember that candy machine I made for E's birthday a couple years ago? I'm happy to say it's been getting some use lately. Some paint, tinfoil and cardstock, and we transformed it into a rocket ship for J's b-day and a Mickey for E's b-day.

And remember the muffin tower I made for a friend's baby shower? It became the a Mickey cupcake tower for E's b-day too. Just swap out the ribbon, paper and treats and we're in business. 
 

Cheap and easy - just the way I like it.


Wednesday, January 29, 2014

We've Got Ears, Say Cheers!

In November, J had a rocket birthday. When E found out, she wanted a rocket party too. But not just any rocket party. It must be a RED rocket party. Whatever that means. Well, I wasn't really in the mood to repeat the rocket theme three weeks later for her b-day. So naturally, I went on the offensive. For weeks, I tried to convince her that she wanted to a have a Daniel Tiger party. This was an entirely selfish request, for I really just wanted to make a trolley cake. Wouldn't that be adorable?

Well, eventually I got her to cave. But not on the Daniel Tiger part. Instead, she said she wanted a Mickey party. With Mickey cupcakes and balloons. This I could handle.

And since E isn't really a fan of big parties anyway, we kept it small and sane. Not the way I usually do things, but I'm starting to see the wisdom in simplicity. (Namely, that simplicity = more sleep, and I LOVE sleep.)

So, we did a cupcake tower, some Mickey candy bowls, a Mickey banner, and some Mickey cookies. And considering her b-day party was two and half weeks before Christmas and two days before a big church event I was helping with, we managed to pull it off and stay sane. And have some Mickey fun in the process. Hot Dog!

The invites...

The cupcake tower...

The banner for the birthday girl...


 The Mickey candy bowls...


Because the Muffin Top is the Best Part


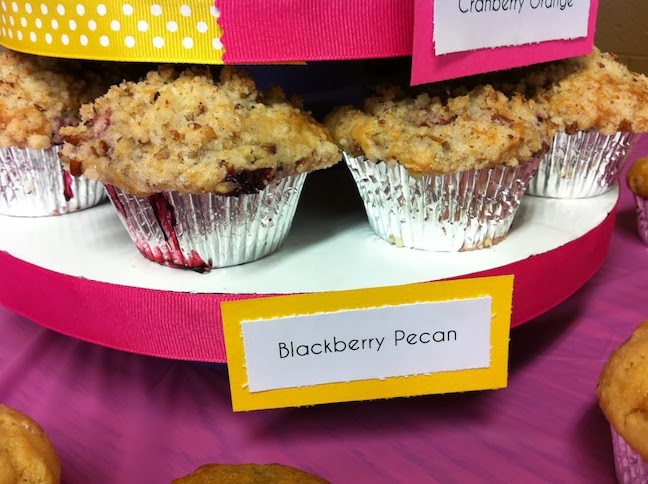
A while back I had the privilege of making some muffins for a friend's baby shower. Since the shower was in the morning, she didn't want the traditional shower cake. So, I whipped up some muffins and used some extra cake circles and tomato sauce cans to create a cute little tower.

This was really easy to do. I had some pre-cut cake circles (in the cake aisle at Hobby Lobby) and taped three together. I used 6-, 8-, 10- and 12-inch circles. If you don't have any lying around, you could use any cardboard or foam board. I just happen to be a girl who has this kind of thing waiting around for a raining day.


Use a hot glue gun to affix some ribbon to the edges. Then take the tomato sauce cans and cover them with scrapbook paper. Glue the cans in between each set of circles and you're all done. It only took about 10 minutes and I think it made the presentation look a lot better.

Oh, and the muffins were delicious. 


Tuesday, January 7, 2014

Blast Off! J is One!

In November, our sweet baby J turned one! (Or as E says, "He's not a baby anymore. He got big.")

A few months ago, I found some cute rocket ship invitations and party supplies on super clearance at Hobby Lobby, and we ran with the theme.

I have this genetic compulsion to go overboard on things, and for my own sanity, I'm trying to break the habit. So we went a little simpler than we did for E's first b-day. But of course, old habits die hard, so we did have a bit of fun!

First up... the food.

We made rocket and star cookies... (I didn't have a rocket cookie cutter, so we used a strawberry cookie cutter upside down.) 


 ...and cupcakes with little paper stars on sticks...


...and of course a cake...


... and some rocket shaped fruit kabobs... (on the left here - I forgot to take a better pic. The stands are dollar store floral foam covered in cardstock.)


And here it is all together.


 For decorations, we used E's candy machines and turned them into rockets...


...A garland with rockets and astronauts, similar to what we did for E (again, I forgot to take a picture!)

...And my favorite - a rocket ship photo backdrop so people could take a pic of the birthday boy in a rocket ship. (It is sitting on a music stand. Background paper from Hobby Lobby, hanging planets from Oriental Trading, the awesome rocket made by Maryke.)

And finally, for activities for the kids, we had a rocket building station where they could make their own rocket ships and birthday hats. There was lots of messy, creative fun going on!


 It was a great party and the birthday boy had a blast!


Friday, December 27, 2013

Awesome Garage Progress

Project Awesome Garage is progressing, albeit a little slower than I was hoping. It looks like we'll be done mid-January instead of before Christmas like I wanted.

But nevertheless, things are moving forward. The insulation is in, the new garage door and opener are in, and the laminate floor is in. Now we're just waiting on the cabinets. My cabinet guy says early January. This excites me greatly. Here are a few photos of the progress.

That's a lot of insulation....
 ... and it has to go up one roll at a time.
 I got pretty friendly with the staple gun and ladder.
Just be sure you look up when climbing the ladder, lest you nail your head on the garage door. Ouch!

And here's the new laminate floor. The mud room unit will be placed between the two doors. They're being painted Benjamin Moore Revere Pewter. I picked it solely based upon Pinterest's love affair with the color. 
 
The floor is great. Already picking up the dirt from the garage, though. Some indoor/outdoor rugs will be in our future.

Next step is installing the mudroom unit, and then covering up the insulation with drywall, or may some kind of pegboard system. Exciting stuff.

Thursday, December 12, 2013

Project Awesome Garage

I love our house. It's a great fit for us and certainly has enough space for us. And while there are a few small things I'd fix, I'm generally really happy with it. There is, however, one thing that must change. We need a mud room.

We have a small coat closet by the front door, but we seldom come through there. We typically enter through the garage door into the kitchen and there is no room there for all the winter coats, hats, scarves, boots, etc. that accumulate. Despite multiple command hooks hanging everywhere, everything ends up on the kitchen floor and is constantly in the way.

Time to initiate Project Awesome Garage. Our goal is to create a mudroom-like space in the garage to contain all the clutter. We don't have room to add a finished room with walls, but we do have a blank wall connecting the kitchen and back doors where we can add some much-needed storage.

Before we can do that - we need to take care of a few more things out there. As you can see, the garage is a cold, damp, crowded mess. And this photo is after an initial clean up!

 The project has four major steps.

1. Insulate the garage. Only one of the four walls of the garage adjoins the house, leaving three walls of uninsulated shiver-inducing plywood. If we're going to add a space to put on and store coats, it needs to be at least 32 degrees at all times. We're hoping some added insulation will also keep the fourth bedroom (directly above the garage) from being so cold in the winter.
 
2. Update the garage door and opener. The old garage door was dented, uninsulated, unreliable and incredibly noisy. Combine that with two light sleepers and a husband who leaves for work early, and everyone is up before the sun. We need something quieter and warmer. (Oh yeah, and one that goes up and down when it should!)

3. Add a new floor to the mud room area. The current concrete floor is cold, damp and not very pretty. We want something that creates a room-like space in the corner of the garage where the mud room will go. (Between the back garage door and the kitchen door.)

4. Install a custom-made bench, shelving unit and hooks. This needs enough storage for all our stuff, a bench and hooks low enough for the kids to use, and a plenty of floor space for things like boots and shoes.

We're making great progress, and I'll go into more detail in some future posts. I'm hopeful we'll have everything done by Christmas!

K for Kate!

Remember the yarn-wrapped letters I did for my friends' daughters Naomi and Lucy? Well, Lucy now has a sister named Katherine! So, here is a K for Kate!

Here it is in process...


And here's the finished product.