Friday, March 9, 2012

DIY Upholstered Headboard

There hasn't been much blog posting around here lately, but that doesn't mean there hasn't been a lot of projects! Look for a few posts coming soon, including ones about a baby shower, some dining room updates and a couple other craft projects.

First up is a new upholstered headboard for the bonus room. We have this great big fourth bedroom above the garage that is the perfect space for guests. We've been in the house for about six years now and up until a couple weeks ago, this room (as well as most of the second floor) still had the builder paint on the walls and the guest bed was nothing more than a mattress and a frame. It always bothered me that our guests never had an inviting, cozy place to stay.

I came across a DIY upholstered headboard tutorial from one of my favorite blogs, Centsational Girl. I really liked the look of the nailhead trim and thought it would be a cute, inexpensive addition to the bonus room. And, my parents were coming in town and I thought this would be a fun project to do together. I LOVE how it turned out!


Here's how we did it:


Materials:
1 piece of 1/2 inch plywood cut down to size
1 6-foot piece of 1x4 wood cut in half 
4 yards of 8 oz batting - enough for two layers
1 nailhead trim kit in Nickel finish from Beacon Fabrics
2 yards of upholstery fabric - I used Cameo Ovals by Dwell for Robert Allen (available at JoAnn's by special order in the upholstery section or online)
12 bolts and nuts and washers
1 yard of 72" wide felt

Tools:
A jigsaw
A drill
A staple gun with both 1/2 inch and 1/4 inch staples
A rubber mallet or nylon-tipped hammer
A ruler
Spray adhesive
Hot glue gun

Step 1: Measure the bed frame width and determine how tall you want the frame to be. 

Step 2: Go to Home Depot or Lowe's and buy a piece of 1/2 inch plywood. If you use a softer wood and not an MDF it will make it easier to put the nailhead trim on. If you don't have a saw at home, ask them to cut it down to your size (in my case 62 inches by 36 inches for a queen). They will do this for free (Menard's won't cut it for you.)

Step 3: Draw your design out on the wood and use the jigsaw to carefully cut it out. Use some sandpaper to smooth out the edges.

Step 4: Cut the 1x4 boards in half. These will be the legs that connect the frame to the plywood. Hold the legs up against the bed frame and mark where the holes should be drilled. Drill the holes.


Attach these legs to the frame and then hold the plywood up against them to give you an idea of how tall you want the finished headboard to be. Mark the back of the board, and then use bolts to attach the board to the legs at this height. We used some furniture grade bolts for this step - they lay flatter than the cheaper bolts and hide better underneath the upholstering.

Some tutorials I've seen skip this step and have you attach the finished headboard to the wall instead of the frame. I wasn't too excited about attaching things to my newly painted walls, so we opted for the bed frame method. It gives you more flexibility when rearranging furniture and I think it looks less like a hotel room that way.

Step 5:  Spray a thin coat of spray adhesive on the front of the plywood. Be careful of overspray because it leaves a gummy residue on everything it touches. Place the batting on the front and wait for the adhesive to dry just enough to hold it in place while you flip it over, batting side down on the ground.  (Make sure the batting is big enough to cover the wood with a few inches extra on all sides.) Some people skip this spray adhesive step, but I think it helped hold the batting in place for the next step.

Step 6: Using the staple gun, pull the batting tight around the plywood and staple to the back side. Make sure you have strong staples. We used 1/4 inch for the batting step and 1/2 inch for the fabric step. The 1/2 inch staples were MUCH easier to use.


Step 7: Place your upholstery fabric face down on the floor and lay the batting-covered plywood face-down on the fabric. If your fabric has a pattern, make sure to line it up where you want it to be.  Pull the batting tight around the plywood and staple in place.

We started with the curvy parts at the top because we thought it would be easiest that way. We did some creative folding on the corners to make sure the fabric lines were clean and tight. Also, we had to trim the fabric to fit around the attached legs. We wrapped the sides around the board, then folded them under as best as we could to maintain a finished edge. Then, we cut the fabric up the legs just to the bottom of the plywood and then wrapped it up. There was a little bit of a raw edge left but fortunately it's at the bottom of the mattress where no one will see.

You could probably upholster around the legs too, but I wanted to conserve as much fabric as possible for other projects in the room. I'll probably stain or paint the legs at some point. 

Step 8:  Affix the nailhead trim using the rubber mallet. Look for a separate how-to post on this coming up soon. The nailhead trim kit makes it so easy - it looks intimidating but it isn't!


Step 9: Flip the headboard over so that it is face-side down. Spray the back with adhesive and attach a piece of felt to hide all the staples. Trim as needed and use a hot glue gun near the edges of the felt to ensure it is securely attached. Again, you could skip this step but I think it makes everything look much more polished.


Step 10: Bolt to headboard. Stand back and admire your handiwork!

I love how this project turned out. The total cost was about $125,  about $80 of which was the fabric and nailhead trim, so you could probably do it for much less depending on your fabric choices. The room now has paint and a new headboard and is well on its way to being an inviting space. Next up is new window treatments, wall art and replacing the TV stand with an actual bedside table. 


Sunday, February 5, 2012

Mommy had a little lamb PART 2


For my friend's baby shower, I also made 50 lamb pops using the process from Bakerella's cake pop book and web site. I had never made cake pops with elaborate decorations on them, and there is a definite learning curve with the melting chocolate wafers. She is right when she says it's a timing thing.

You have to have the chocolate hot enough to have enough time to attach everything before it dries, but cool enough that everything doesn't slide right off. These took waaaayyyy longer than I expected, but I think they're adorable!

Also, I wasn't thrilled with the idea of the cake pops being super crunchy so I substituted Kraft Mallow Bits for the sugar pearls. I got them at Target for $1.50 each and it took 4 containers to do 50 pops, with a bit left over. Also, I used junior mints for the faces instead of licorice, just because I think black licorice is nasty (and the bridge mix in the recipe is expensive at Woodman's!) They're still a little crunchy but not as much as I expect the sugar pearls would have been.


I can't take credit for the super cute tins with the grass - one of the shower hostesses put those together, but they look adorable and were a great centerpiece!


Mommy had a little lamb


A friend of mine is having a baby in a few weeks, and I am so, so, so very excited for her. I agreed to make some desserts for her shower.

First, the cakes. I  I put together two 3-layer 8-inch round cakes, one with pink fondant and one with blue. She has a lamb theme going, so I put some lambs on the tops and the sides.
I again used bunnywoman's trusty marshmallow fondant recipe from the Wilton forum site. I halved the large batch recipe (8oz of marshmallows and 3 1/2 cups of powdered sugar), which seemed to work well, although I would recommend still using 2 Tbsp. of water. This is another instance where I LOVE the dough hook on my Kitchenaid mixer - making fondant is such a pain without it and a breeze with it! I also recommend adding the coloring (I use Wilton gel in the small jars) to the melted marshmallow before adding the sugar - it saves a ton of kneading time.

And can I just say that when Wilton says their gel coloring is named pink, they really mean freaking bright electric super neon pink. I guess that more accurate description wouldn't fit on the jar. This lovely pastel pink color is called rose petal pink and was a much better choice. The blue is cornflower blue - both colors came in a boxed 4 pack, along with a peach and a sea green.


I've never piped words on to a cake before and I wasn't quite sure how to go about it. I was worried that if I freehanded it that the spacing would be off or I would run out of room. 

So I made a template in Word and printed that off. (I used wordart to create a 6.75" circle of round text). I placed it over the top of the cake and used a toothpick to prick through the paper to create tiny holes underneath. I then used the marks on the cake as a guide to pipe the frosting over the top (using a Wilton #5 tip.)


 For the boards, I took 3 round cake boards, used some packing tape to tape them together and then covered them in aluminum foil. I love how these cakes turn out and the beautiful mama-to-be seemed pleased as well!

Friday, January 27, 2012

Crib Teether Guard

I finally got around to finishing that crib teething guard that I saw on Pinterest. It only took me about four months :) Although now that I think about it, that's really not too bad considering all the holidays and parties in November and December.

E is a late teether, but when they came in it was crazy - six teeth in eight weeks and nobody was getting any sleep! I love the crib that we bought for her and didn't want those new sharp teeth marking it up. I was inspired by a couple teething guards (this one and this one) that I saw on Pinterest.

I had some leftover fabric and decided I could figure this out. I had to piece together a few fabrics and I backed it with the white minky fabric that we used for her quilt. (I use "we" liberally here, seeing as my mom did all the work on the bedding.) I liked the look of the bias tape on one of the pinterest examples, and used this tutorial and a few phone calls to mom to figure out how to put the blue bias tape on the edges. I always thought bias tape was one of those insanely difficult things to master, but it wasn't bad at all.

If I would have thought about it ahead of time, I would have put the ties on before the bias tape, but I guess I'm not as good at foresight as I once was. So I used a seam ripper to make some room between the bias tape and the fabric, shoved the tie in between and restitched. Not the cleanest or easiest way, but it worked. And it was on the back side so it's not really visible.

I have another one in progress that will go down the long end of the crib, but I'm not sure I need it now. The side of the crib is right by the door, so E never really hangs out by that side. We've had it in place for about a week or two now and so far she's only figured out how to pull it off once. I moved the end ties around the corner post and that seemed to help. I am optimistic that it will keep the crib in great shape for any future uses :)

Sunday, January 22, 2012

$5 wall art

I bought these unfinished pine mirrors from Ikea a few years ago - a pack of four of them for $3. And I never really had a good sense of what to do with them. It's just the lure of cheap crap from Ikea. I can't resist.

Anyway, last year I painted two of them for E's room, and stuck the other two unfinished on the wall in the downstairs bathroom. I always intended to do something with them, but never got around to it.

Well today after a tea party with the girls, we visited this crazy fun shop in Antioch called Hannah's where I found some very cute scrapbook paper. When I'm out with the girls I have this horrible habit of buying lots of scrapbook paper and then never using it. I have a lot of very cute paper just sitting around waiting for inspiration and free time to coincide. Alas.

So, I was determined to do something with the paper I got today. After E went to sleep, I got out my cutting mat and some mod podge and put the paper on the mirror. Easy peasy and I think they look great - and lots better than the unfinished wood! And cheap too - $5 total!

Saturday, January 7, 2012

A Few Party Ideas...

A friend of mine recently asked for some help with a few decorations for a gathering she was having with some friends. I pulled together a few ideas and we decided to try a few things we found on Pinterest (where else?)

First, we bought18 wine glasses from the dollar store and dipped the bases in chalkboard paint. My friend already had the paint, so the total for this project was only $18!

This was a pretty simple project. I dumped some paint into an old Ziploc brand container and then dipped the glasses into the paint. (The dollar store glasses are the tiniest bit too big to dip straight into the paint quart.)  The hardest part was figuring out how to let them air dry.

I used a quart of rustoleum chalkboard paint, but I think it would be easier to use chalkboard spray paint, simply because instead of dipping the bases in paint you just spray the bases and don't have to deal with all the drips. Anyway, I held them over the paint bowl until all the major drips ran off, then propped them up on a couple Ziploc brand containers and rotated them every few minutes until they were dry enough to stand upside down without dripping. I also wrapped painters tape around the base of each stem to stop any drips. This also helped keep the glasses from rolling off the containers. If I thought more about this step ahead of time, I probably would have tried slicing up an old foam pool noodle and placing each stem in a slit to dry.


Within an hour or so, they dried to a nice smooth chalkboard finish and will be a fun way for guests to mark their glasses. You could do this with anything and I am already thinking of other ways to use chalkboard paint - hot cocoa mugs perhaps? 


Next, we took some inspiration from Martha Stewart and put together some labels for the buffet table. I simply cut out an oval shape, used a hole punch on each end, and fed a ribbon through. (I'd suggest writing on them before feeding the ribbon through, if you can.) These were simple to make and look elegant on a table. You could also use these as table place cards - I made 20 for less than $4.


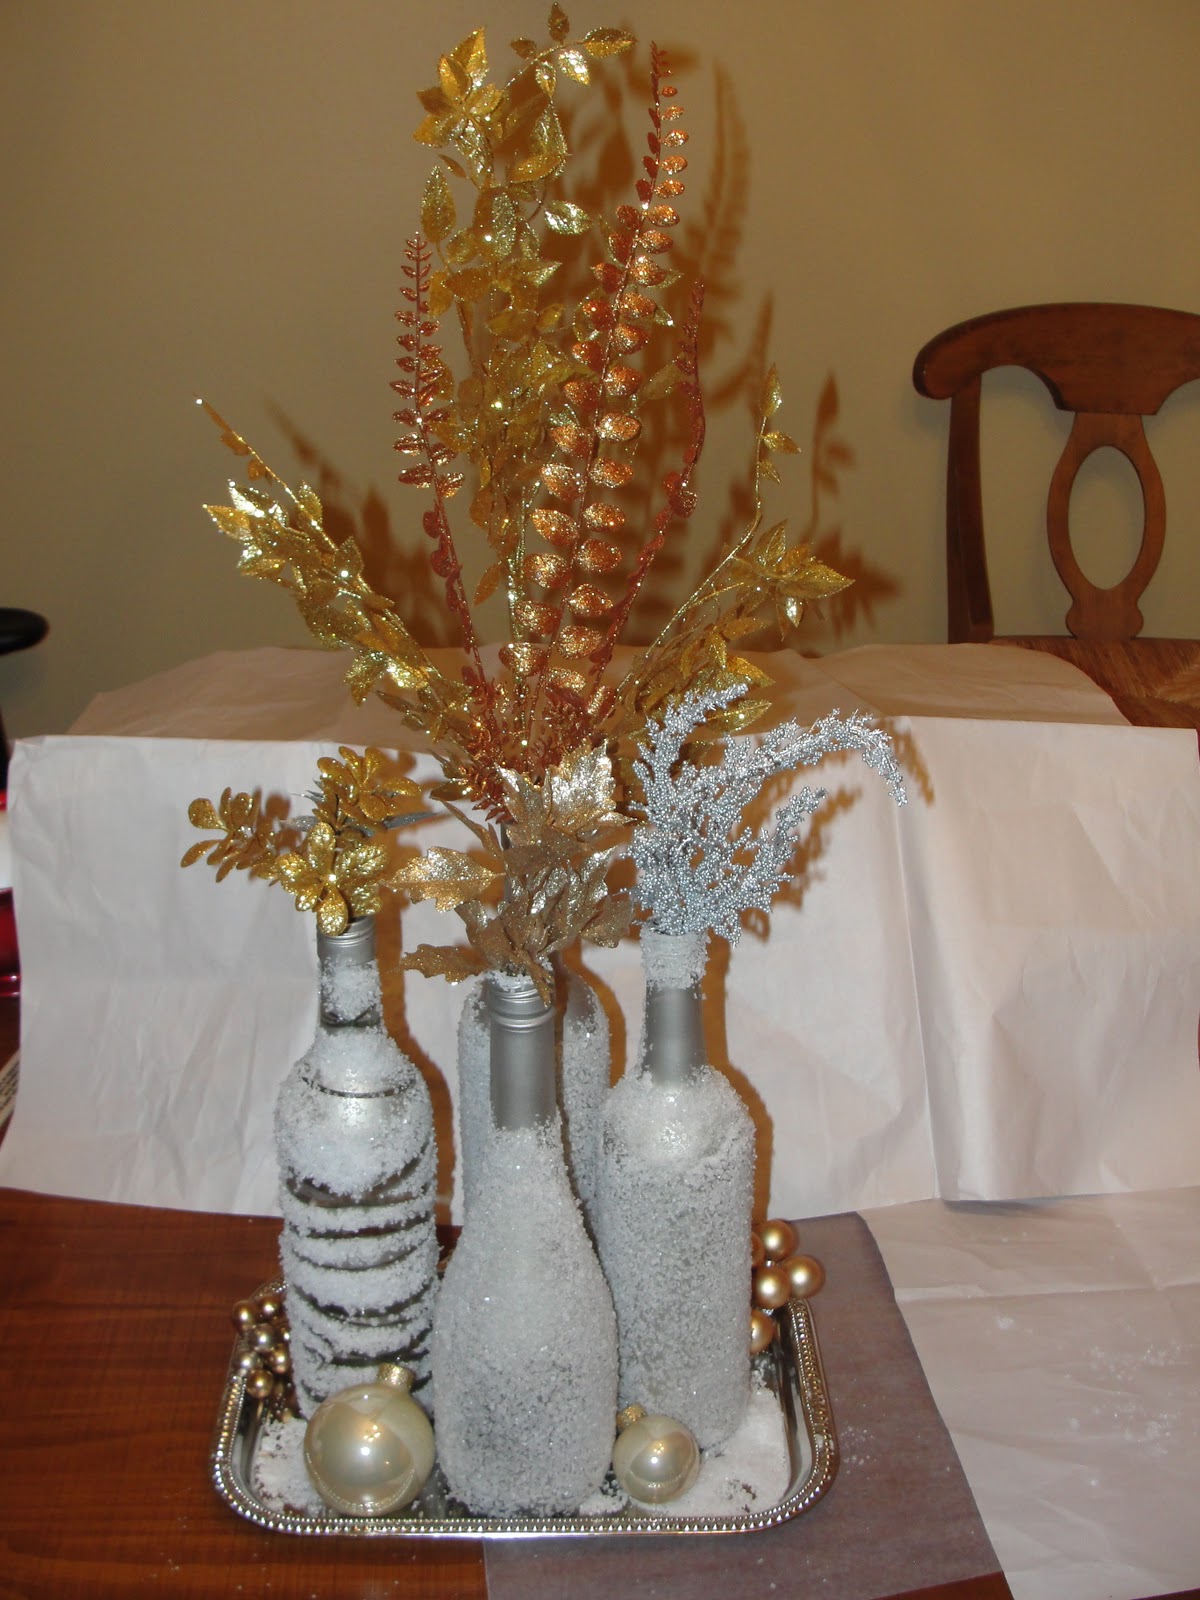
The final project was a bit more ambitious because I had never spray painted before and have always been intimidated by it. It was easy! We collected a few empty wine bottles (it helped that this was the week after New Year's!) I spray painted them a nickel color (Krylon has a line of metallic colors.) Then, after they dried, I used Elmer's craft spray adhesive to coat the outside and then rolled them in Epsom salt. The salt makes the bottles look like they were coated in snow. You can get the Epsom salt at any drugstore for a few bucks - I got this carton in the first aid section at Target. (The paint came from Hobby Lobby and the glue from Michael's.)

To give a little added dimension, I put some rubber bands on one of the bottles before painting. After rolling in the salt, I removed the bands to expose the clear glass. It's difficult to see here but it gave it a neat look with a stark contrast between the snowy white and the clear glass. It would be really cool to drop in a thin candle or an led light to twinkle through the glass.

I placed the bottles on a silver tray from the dollar store, then filled them with some metallic floral stems from the after-Christmas clearance at Michael's. I added some more salt to the tray to look like snow and then arranged some ornaments, metallic balls and tea lights around the base of the tray.

One note about the spray adhesive - when using it, be sure to pay attention to overspray. I placed paper around the bottles before spraying, but still managed to get glue all over my dining room table, my scissors and my hands. It definitely gets everywhere and leaves a sticky residue. Fortunately I had some Goo Gone on hand to clean everything up.

These were fun projects for me and I was able to try a few new things - like spray paint and chalkboard paint - that I had been looking to try.

Handmade by Holly


My sister-in-law Holly put together this really great photo puzzle for my daughter for Christmas. She started with a basic Melissa & Doug shapes puzzle, but you could begin with anything. First, she updated the front of the pieces with some adorable coordinating scrapbook paper. Then, underneath all of the pegs, she mod-podged photos of family members. My daughter loves pulling off the pieces to see who is underneath! Thanks Aunt Holly!